House of da Vinci walkthrough. The House of Da Vinci - Mysteries of the house of Leonardo da Vinci. The walkthrough is relevant for all versions of the game
Harvard professor Robert Langdon and police cryptology expert Sophie Neveu are faced with an age-old mystery regarding the Holy Grail. Hidden in Da Vinci's paintings is a secret code that reveals the location of the Chalice and the path to it.
Chapter 1 – Louvre
After talking with Inspector Fachet, proceed to examine the corpse lying on the floor of the museum. This is Jacques Saunier, curator of the Louvre. Examine the magical figure on the victim's stomach, right leg, left arm and the victim's clothing.
After examining the body, Sophie will enter the hall and give you her business card. Go into your inventory and examine the business card from both sides. On the back of the business card at the bottom you will find three numbers "454". Take out the cell phone that Inspector Fache gave you and dial 454. Listen to the message.
Now you and Sophie are in the museum toilet. Take the soap lying next to the sink. Enter the inventory and connect the soap with the tracking device that the police quietly planted on you. Open the window and throw the surprise soap onto the roadway.
When all the museum police are looking for you, you and Sophie can leave the toilet and return to the room where the murder took place. Here you have to solve the first cryptogram. The phrase "Oh Lame Saint" will appear at the top of the screen. Click on the corresponding letters so that the inscription “The Mona Lisa” appears below.
From now on you will play as Sophie. Without attracting the attention of the police, carefully make your way to the far end of the gallery. Click on the button to open the passage to the next room. Stealthily sneak past two police officers to the exit. In the next room there is one policeman who is facing a cabinet brought from the police station. It contains all the necessary tools and chemicals needed to conduct an autonomous crime scene investigation. Pick up the stand from the floor and, carefully approaching the policeman, hit him in the head with this stand.
Look inside the closet. Move the reagent container on the top shelf to the side and take a special lamp that emits ultraviolet light.
Next, the game will continue in the hall in which a painting of the Mona Lisa is exhibited. Now you will again continue the investigation together with Langdon. Shine UV light on the Mona Lisa. Incomprehensible symbols will appear in the foreground. Shine a UV light on each character to switch the screen to a smaller display of those same characters. You must replace all symbols with ordinary Latin letters so that you get a clear phrase.
DA VINCI
PAINTED THOSE
THAT KNEW
BETWEEN BACCHUS
AND URIEL LIES
THE CLUE
When you finish solving this riddle, take the Sphere of Saturn artifact from the hands of the statue in the center of the hall.
Exit to the central gallery. Explore the upper painting area hanging above the painting of John Baptist. Raise Sophie so she can take the monastery ring from the frame surrounding the picture. Now go into the corridor that leads to Saunier's office. When you hear the voices of the police, go out into the main hall and hide behind the nearby pedestal. When the police are dispersed around the hall, carefully sneak past them and go into the office.
Examine all the objects lying on the table. If there is a need to improve your health, then to do this, take an adhesive plaster from the top right drawer. Now go to the map hanging on the wall and examine it with the help of UV light. Find the area circled on the map. You have discovered another secret. Approach the ventilation grille located under the ceiling to the left of the map. Help Sophie reach the grate to open it. Sophie will crawl along ventilation duct to the next room and will open the door for you.
Go to the table at the back of the room and read the instructions regarding mixing various chemicals. Behind you on the box is Da Vinci's invention, the Da Vinci Air Screw. Take the artifact, the second one in your collection.
Now go back to the exit and look at the table covered with flasks with various chemicals.
From left to right there are flasks with tags:
- Chitanase
- Dismutase
- Lactase
- Catalase
- Urease
Fill a beaker with liquids from flasks 1, 2 and 4.
Take the towel from the drawer opposite the table. Go into inventory and combine the towel with the beaker. Now wipe the dirty painting with a towel soaked in a special composition. After the scripted cutscene, take the first aid kit hidden behind the tall paintings. Return to the room where the Mona Lisa is displayed.
Go to the left side of the hall. To your right you will see a security guard making another round of the museum. Slip into the next room unnoticed by the guard. Head into the hall on your right. Stop in the right doorway and wait until the guards are called by radio. Now that the way is clear, run with Sophie into the next room. Go down the right stairs. Pick up the stand from the floor. Climb to the platform where the sculpture is installed on a pedestal. Quietly sneak up behind the guard and hit him on the head with the stand. Then go up the left stairs and approach the exhibit under the glass bell. Look at the bronze plaque describing the exhibit. Find the ring-shaped indentation on the plate. Insert the monastery ring into the recess and take the fleur-de-lis disk from the hiding place.
Go down to the platform where you found the rod. Take cover behind the right column to avoid being detected by the guards climbing the stairs towards you. As soon as the guards turn in the opposite direction from you, quickly go down the stairs. Examine the railing on your right. Find the coin - the last artifact in this chapter. Enter the hall where the sculptures are displayed. Carefully sneak along the passage behind the statues to your left. If you haven't attracted the attention of the guards, you can leave the Louvre without any problems.
Chapter 2 – Monastery of Saint Sulpice
After communicating with Sister Margarita, look at the monk lying motionless on the floor of the bedroom. Take a small first aid kit from the nightstand between the beds. Follow to the bedroom where the body of Sister Sandrine lies. Find a piece of paper with phone numbers next to the body. Examine your sister's hand. She is stretched towards the bed. Come to the table. Look at the piece of paper with the numbers "7:14". Examine the cabinet to the right of the table. You need a key to open the doors. Exit the bedroom and go through the door to your right.
Go to the other side of the balcony, open the door and go into the storage room. Take the wire cutters from the bottom shelf and the oil can from the top shelf. Return to the living area of the monastery.
Go into an alcove with two doors. Go through the door directly opposite you.
You went to the roof of the monastery. Sneak after the monk. Use a sneaky move to hit him on the head. Walk forward a little more and look at the symbol diagram on the left wall. Under each symbol a specific letter is drawn. The diagram shows all alphabet A-Z and a number series from 0-9. Write down the alphabetic and numerical meaning of each symbol, as this knowledge will be useful to you when solving subsequent riddles.
Return to the living area of the monastery. Go into Sister Sandrine's room. Move the bed next to Sister Sandrine's body to the side. You will find a locked safe under the bed.
Take a close look at the letter tiles. Place "Sion" in the center of the plate to unlock the safe. Take the bronze plate with JRU symbols from the safe.
Return to the roof of the monastery. Enter the passage on your left and go down the stairs to the locked door. Unlock the door, go down the stairs and unlock another door to exit into the main hall of the monastery.
Without attracting the attention of the monks, go to the far right corner of the hall. Find the column marked with the Roman numeral VII. Opposite it there is a shell-shaped container filled with healing water. There is a decorative key at the bottom of the container, take it. Go into the dark alcove between columns IX and X. Find a tin coin in the depths of the alcove - the first artifact in this chapter.
Return to Sister Sandrine's room. Use the key on the locked cabinet. Take a small engraving of Jesus Christ from the closet. Return to the great hall.
Go into the dark alcove between columns III and IV. Read the book lying on the altar. Then look at the two slabs next to the altar. This is where you need to apply the information you learned from the book. Place “Aprilis” in the window of the left slab and “XI” in the right one. Now exit the alcove and take the statue of Jesus carrying the cross from the pedestal.
Approach the locked door next to Pillar VII. Use the wire cutters to cut through the padlock, open the door and go up the stairs to the balcony on which the organ is installed.
To your left on the floor near the fence is a large first aid kit. On the right side of the organ there is
big handle. Examine the knob to be able to adjust the timing of the organ. Set the clock to 7:14. A secret niche will open in front of the organ, in which lies a copper plate with the initials AEM. Take the plate and go back down to the hall.
Examine Column VII. Place the Jesus figurine with the cross on the ledge in the column. Now find column X IV and place the engraving of Jesus on the ledge of this column.
Open the hatch in the floor between columns X and XI and go down to the basement.
Approach the pile of boxes to your right. Find an ancient artifact on one of the boxes - Da Vinci's invention. Turn left and go to the stone pedestal with three lanterns on it. Pour oil from the oil can into the table through the hole in front of the three lanterns. Open the lanterns and place the bronze plate in the bronze lantern and the copper plate in the copper lantern. Use matches to light the wicks on all three lanterns.
The word Jerusalem will appear on the wall opposite the lanterns.
Move aside the stone sarcophagus to the left of the inscription on the wall. Behind the sarcophagus on the wall you will find a row of nine symbols. All these symbols were on the diagram that you saw on the roof of the monastery. You must click on the symbols in such an order that you form the word Jerusalem.
Alphabetical meaning of each character:
/S/E./R/J/L/A/M/E../U
Since the word Jerusalem contains two letters E, first click on the symbol corresponding to this letter with one dot, then, when you need to insert the second letter E, click on the symbol with two dots.
Having correctly solved the riddle, you will open a cache that will contain a list of members of the Saint Sulpice monastery. Read the list of monastery members.
Carefully make your way past the monks to the stairs and go upstairs into the hall. Here, too, without attracting the attention of the monks, get to the exit and climb the stairs to the roof of the monastery. Enter the residential area of the monastery. Knock on the door to your left into Sister Margaret's room.
Chapter 3 – Mansion in Normandy
Throughout this chapter you will play as Sophie. Walk past the dog guarding the approach to the bridge turning mechanism and turn right towards the extension. Climb inside the extension through the window. As soon as you start moving inside the annex, the leader of the monks, Silas, will climb into you through the same window. Kill him before he can cause significant damage to your health. Then go to the locked box lying on the shelf next to the board with numbers. Combination to the lock: 132134. Take the key to the mansion from the box. Exit through the door to the previous location in front of the bridge.
Run to the opposite wing of the extension. Knock down the door. Find the freezer inside and take a large piece of meat from it. Leave the room and go to the open cage in which the dogs are kept. Place meat in both bowls. Exit the cage and go left towards the arch. Pull the rope to make the bell ring. Dogs, hearing a familiar sound, will run to feed. Follow the bridge movement mechanism. Turn the bridge perpendicular to the cliff and cross the bridge to the other side. Go to the door and use the key on the lock.
Go into the alcove on your left. Open the cabinet, in which take the figurine of Aeneas from below. Go into the room opposite the closet. Stand facing the fireplace. Place the last missing disk on the mantelpiece. Go to the dressing table with the mirror and take the Cupid figurine from it. Leave the room and go up the stairs to the second floor. Unlock the door using the monastery ring.
Once you enter the room, first examine the bed to find the second artifact. Take Da Vinci's invention in the far left corner of the bed. Now go to the chest of drawers next to the bed. Read the poem on the piece of paper in the main top drawer. There is a clue in the words of the poem regarding how you should spin the discs below. Take the first aid kit from the middle right drawer. Unlock the lower left drawer using the ring and take the Vulcan figurine from it.
Go down to the room with the fireplace. Align the disks from left to right so that the peaks point in the following directions:
down, right, up, left
Take the figurine of Venus from the lion's mouth.
Return to the bedroom. Go through the entire room and exit into the library. Go to the table on your left. Open the box and take the Jupiter figurine from it.
Go down the spiral staircase to the lower level of the library. Deal with the monk before you can begin exploring the room. Approach a table littered with various papers. Touch the miniature model of the house. Then look under the table and pick up the Mars figurine from the floor.
Exit the library through any door and go into the hallway. Climb the stairs to the second floor. Examine the painting on the left wall. Find the Sphere of Jupiter at the top of the painting. Return to the flight of stairs and go up to the top floor. Go through the door into a small room.
Approach the oval table with a five-pointed star painted on it. Place all six figurines in a row on the bottom shelf. Then take each figurine one by one and place it in its proper place on the table.
Place the figurines on the table in this order:
- Statuette of Aeneas at the lower right point
- Figurine of Mars in the upper right point
- Cupid figurine at the lower left point
- Figurine of Jupiter at the main upper point
- Venus figurine in the center
- Figurine of Vulcan in the upper left point
When you display all the figurines, make sure that they are all facing Venus. The figurine of Venus should be facing the figurine of Aeneas.
After a short video, the game will continue in the garden next to the house. The garden is a large enlarged copy of a table with figurines. In the center of the garden there is a statue of Venus, around which there are five more statues at a short distance. You should turn all five statues towards Venus. There are three guards cruising around the garden. Hide from them or go into direct combat. When all the statues are turned towards Venus, the podium on which this statue stands will rise up a little.
Find the entrance to the grotto on the podium. After going down, go to the statue of the king and take the extinguished torch. Light a torch from any open fire source. There are five bowls in the center of the grotto. You need to light certain bowls to solve the puzzle.
Stand in that part of the grotto so that the bowls are located to your left and right. Let's take the 12 o'clock dial of a watch as a symbol for the bowls.
IN this moment you must be next to the bowls marked 7 and 5.
Now use a torch to light the bowls in this order:
12 10 5 10 2 10 7
Another chapter is over.
Chapter 4 – Bank in Zurich
First of all, talk to the guard at the desk. He will tell you where you should go to pick up valuable cargo from a safe deposit box. Go into the central hall of the bank through two doors on your right. Exit the hall through the central door on the left side.
Go to the control panel and insert the key into the hole to gain access to the room where valuables are issued from the bank vault.
Here again use the key on the control panel. Expect a box from the bank vault to appear on the table. To open the box you need to know the password. Click on the box to draw attention to the symbol. Enter the password "1021" and take Cryptex from the box - a video with Latin letters.
Examine the box again. In the case in which the Cryptex was located, you can see a tiny hole. Go to the table on your left. Examine the contents of the drawer. Among other office supplies, find paper clips and take one for yourself. Use this paperclip on the case. By inserting it into the hole, you will thereby open a hiding place in which lies a piece of paper with a poem. Go into inventory, select Cryptex and "use" it. Enter the word "GRAIL". The bank manager will enter the room. He asks you to leave the bank immediately, as you are on the list of unwanted clients due to a wanted list against you. To avoid publicity, he is ready to help you get out of the bank.
Get a microphone, a Level 1 access card and a vehicle key from him.
Exit to the central hall. Go to the elevators on the left side of the hall. Use the card in the elevator reader.
When you are in the elevator, the manager will inform you that the bank security has received a target for you. Raise Sophie so she can open the top hatch. Get onto the elevator roof and turn the valve to open the emergency exit.
Follow the corridor to the right of the elevator. There are two guards patrolling the floor ahead. Enter the service room through the first door on the left side. Here, take the first aid kit and the Mars Orb from the top shelf. Exit the room, walk a little forward and enter the bank's office sector through the door on the left side.
This area is patrolled by two guards. Sophie will not follow you, she will wait for you in one of the booths until you solve your share of riddles. Without the guards noticing, slip into the far right booth. Find the Da Vinci ballista model on the shelf.
You should now reach the administrator's office. Go to a room with fewer booths (about 7). Go through the door with the Administrator sign. Go to the table and insert the card into the reader. The manager will contact you and tell you the password to access the system. Enter the password "867530". Access to the system is denied, you need a different password.
Now, on the advice of the general manager, leave the office and return to the previous room. Go right to the door with the sign "Caroline Chatal". Come into the office. Examine the lower part of the painting using UV light. Examine the fingerprints. Now you can pick up the painting behind which the safe is hidden. Turn to the table. Open the right middle drawer. There is a piece of paper with the password to the safe. Then open the bottom left drawer to get a large first aid kit. Use the password you found in the desk drawer to open the safe "728559". Get the key to the box in the records department.
Leave the office and go right to the documentation department. Go to the furthest cabinet with drawers that you can "explore". Unlock the top right drawer with the key. Now you know the password to log into the administrator's office.
Return to the administrator's office. Insert the Level 1 access card into the reader and enter the password "260924".
You now have a Level 2 access card at your disposal. Leave the office and then leave the room. Turn right and walk along the wall to a locked door, which can be opened by inserting a level 2 card into the reader. Insert the required card into the reader and go up the flight of stairs. Sophie will join you here. Go down with her. Open the door and go out into the corridor. Go to the end of the corridor and open the door on your left. Go out into the bank lobby. Crouch down and go left.
Open the door marked "Deposits and Safety Deposit Boxes" and proceed to the next area. Go to the far right side of this room. Locate the ventilation grille near the ceiling. Stand exactly under the grate and press the E key. Help Sophie reach the grate and open the passage into the ventilation shaft.
From this moment on, for a short period of time in the game you will control Sophie’s movements. She crawled through the ventilation shaft and found herself in the room where the bank's servers were installed. Sneak up to the guard closest to you and deal him a stunning blow to the head. Then head to the small room where the main computer is installed. A guard stands near the monitor with his back to you. Quietly sneak up to him and hit him on the head with all your might. Now insert the Level 2 access card into the reader to upgrade it to a Level 3 access card. Leave the room and open the door to your left. Go to the locked door and insert the level 3 card into the reader. The door will open and you will be reunited with Robert. Walk forward a little and turn left. Go into the cabin and find an iron coin here.
Return to the bank lobby. Sneak to the far door on your left past two guards talking near the fountain. Open the door and go into the bank vault.
To open the grille, insert the card into the reader. When the grate opens, go into the narrow passage and sneak behind the guard. Choose the most opportune moment to deliver a stunning blow to his head. The next guard will meet you in just a couple of meters. He guards the entrance to the open room on your right, which also contains the valuables of the bank's clients. Enter the fight with him. After a successful outcome for you, go into the room and pick up the first aid kit from the floor. Now go to the opposite side storage facilities. Get the last guard out of the way and go through the door in front of which there is a large arrow drawn on the floor. Go to the armored door and use the vehicle key here.
Chapter 5 – Villette Castle
Meet Sir Lee Tibbing. He will tell Sophie about the Holy Grail. Go to the reception hall. Listen to Tibbing talk about heraldry shields, knight's armor and paintings. Examine these two paintings. Explore and listen to descriptions of all the shields standing under the windows. Select and bring Percival's shield with the red heart to the knight on your left. Install it on knight's armor. Then take Galahad's shield with the cross and take it to the armor of the knight on your right. When this shield is installed on the armor, both doors at different ends of the hall should open.
Enter the room next to the knight armed with a shield with a cross on it. Go to the fireplace. Look at the shelf on which bowls with the coats of arms of different knights are displayed in a row. Examine the bookcase next to the open door. On the shelf you will find a piece of paper Song of Solomon: verse 14, line 4, word 3. Return to the reception hall and enter the room next to the knight armed with a shield with a red heart.
Look to your left. In the corner of the room there is an empty pedestal with the Arthur sign. Go to the bookcase and look at the open bible. Find the fourth line and select the third word - "Hear". Return to the room with the fireplace. To his right there is a locked door. Enter the word "Hear" on the combination lock panel and the passage to the next room will be open.
Enter this room and look at the piano. Open the door opposite the piano and enter the tiny room. Examine the floor under the table to find the Venus Orb. Return to the room with the fireplace. Take the Red Dragon Cup from the shelf.
Go to the room with the empty podium. Place the bowl on the podium to open a secret passage behind bookcase. Go to the apartment. Assemble the mixed pieces into a painting seen at the Saunier mansion in Normandy. By solving this simple riddle, you will unlock the door to your left. Enter the room. Take the sheet of music from the table.
Go to the room with the piano. Place the sheet of music on the piano to display the notes and the keys above them on the monitor screen. Your task is to press the designated buttons on the keyboard and mouse in a timely manner. Press the E button to start playing the melody. When the key at the top is highlighted in a yellow frame, click on the corresponding button on the keyboard or mouse. If you pressed correctly and in a timely manner, the note should turn green or red if you did something wrong.
After playing the entire tune, listen to Tibbing and Robert. Go to the next room with a fireplace. Opposite the fireplace there is a painting hanging on the wall. Find and mark four active areas on it. Then go into your inventory and select "Cryptex 2". Select "use" and place "Magdalene" in the center of the video.
The next goal is to collect the three parts needed to construct the ballista. Go up the stairs and go to the room with the piano. Take the globe in the left corner. After this action, Silas will burst into the room. Repel all of Silas' attacks. When he runs into another room, Sophie will put the globe on the lift to lower it to the basement. Run after Robert. When he stops in front of the second part of the ballista, try to pick it up. Silas will appear in front of you again. Repel all his attacks and push him into the next room. Go to the reception hall and from there exit into the hall. Go through the door on your right. Go to the far left corner, and Silas will appear in front of you for the umpteenth time. Repel all his attacks and watch the final video of this chapter.
Chapter 6 – Airfield
Slide the trash can to block the door. Lower the lever to the down position. Approach the trolley. Shift the lever to release the trolley from the brake. When the trolley starts moving, walk with Sophie next to it. This way you can approach the hangar without fear of being shot by the police. After the trolley stops, approach the door and enter the hangar.
Take the Da Vinci Bridge artifact from the box on your right. Then go to the toolbox on the other side of the hangar. Take the wire cutters from the top compartment. Now turn 180 degrees and go to the other end of the hangar. Use wire cutters to cut through the lock shackle on the lattice door. Enter the fenced area and go left. Go up the stairs. Take the first aid kit from the table. Use the control panel to the left of the table to move the container below. Go downstairs. Two police officers will enter the hangar. Together with Sophie, enter into battle with them. Then go into the warehouse entrance, which was previously blocked by a container. Explore the shelves. Take the lighting stick from the box. Open the hatch in the floor and go down.
You went down into bunkers built during the Second World War. Go forward and go down the stairs. After leaving the steps, take a couple of steps forward and turn right.
Listen to the police conversation that comes to you through the ventilation grill.
Go through the open doorway and open the hatch in the floor. Go down and look to the right. You will not be able to open the massive door until the power supply is restored. Turn around and go to the other side of the tunnel. Turn right and almost immediately enter the tunnel on your left. Go up the stairs and find a padlocked door. Use wire cutters on the lock shackle.
Open the door and go to the other side of the room. Open the door. Find the electrical panel at the end of the next room. Unplug three 50-rated fuses from their sockets. Go out into the large room in which the generators are installed. Turn right, walk forward a little and turn right again. Go to the electrical panel. Unscrew two 300-rated fuses from their sockets. Turn around and cross the bridge to the other side of the room.
Go up the stairs to the control room. Explore the shelves and find the first aid kit behind the cans of chemicals. Take the elevator up to the tower. Here, find the electrical panel and remove three 300-rated fuses from it.
With all this stuff, return to the control room. Cut off the police officer who gets in your way and go down the stairs to the room with generators. Cross the bridge to the other side. Fight the police. Then go down the stairs to the lower level. Follow to the opposite side of the room. Remove all fuses from the box.
You should now have eight 300 rated fuses and four 50 rated fuses. To the right of the switch there is a wiring diagram on the wall. Examine the circuit using UV light. You will find out which fuse you need to screw into which socket. Return to the main box to the left of the diagram. Insert two 50 rated fuses into the sockets in the lower left corner of the box. Then insert four 300 rated fuses into the sockets in the upper left corner and four more fuses of the same rated value into the sockets in the upper right corner. Now pull the main switch to turn on the generators. Return to the stairs. Turn left and go into the pocket. Approach the symbol drawn on the wall. Turn around and take the Mercury Coin. Return to the stairs and go up. Go through the room with the floating pipes and go down the stairs into the bunker. Go out to the illuminated area of the bunker after a policeman passes not far from you. Turn left and go into the pocket in the wall. Explore the area around you and find the Quicksilver Sphere. Now follow the door that you previously could not open due to lack of power. On the way to this goal, deal with two police officers. Pull the lever to open the heavy armored door.
Go through the door and follow the corridor, which will lead you to a room with rotating mechanisms. Use the stairs on your right to go upstairs. Go into the next room and go up the stairs.
Go to the left side of the area, filled with containers. Stun the policeman standing near the barrel of aviation fuel. Using wire cutters, cut the shackle of the padlock that blocks access to the valve. Turn the valve to open the fuel supply. Climb the ladder onto the roof of the nearby hangar. Knock out the policeman and go to the edge of the roof. Another chapter is over.
Chapter 7 – Temple Church
Enter inventory. Find your encrypted message and select “use” to begin solving the cryptogram.
Correct solution:
OUTDOORS THE
GRACEFUL WATER
YOU WILL SEE
THROUGH
DEDICATION YOU
MUST FIND THE
KEY
When you are finished with the cryptogram, Robert and Lee Tibbing will go to church. Sophie is given the task of entering the church through the emergency entrance. Turn around and run to the house closest to you. Find the stairs on your right. Go downstairs and look for a bag of garbage on the floor of the window near one of the houses. Examine the window and find Silver coin. Return to the square in front of the church. Go to the main entrance of the church and look at the notice board. The board is covered from rain and wind by a transparent flap. Open the door and take the key on the right side of the board.
Go to the locked gate to the left of the main entrance. Use the key on the lock and go into the church territory.
Take the crowbar from the ground and use it on the bandit from Remy's group. Enter the last arch and look to the right. Find the Lunar Sphere among the pile of garbage. Return to the place where you encountered the first bandit. Go through the two arches and turn right to the stairs. Go up. Take out the two bandits near the fountain. Find a garden wheelbarrow not far from the fountain and take the pruning shears from it. Trim the flowers in the flower bed next to the fountain. Read the sign and use the ring on the box lid. Take the metal plate with symbols from the cache.
Robert woke up after the attack to find himself locked in a small room inside the church. Examine the table filled with boxes. Find a sheet of cardboard behind one of the boxes. Now pay attention to the pallet with barrels. Look closely at all the active items on the tray and look for the metal bar in the center of the coil. Examine the table opposite the door. Pull the chair out from under the table and take the small gear wheel. Approach the door and notice the gap between the door and the floor. Slide a piece of cardboard under the door and use the rod on the keyhole. Robert received the key. Use the key on the door lock and leave the room. Go to the room opposite and take the Da Vinci ship model from the cabinet on your right. Go out into the corridor. Sneak up to the guard and deal him a stunning blow to the head. Enter the corridor to your left and approach the non-working gearbox. You must find the missing parts to repair the gearbox. Return to the next room and go through the door into the hall where the services are held.
Go a little to the left and start fighting two big guys from Remy's gang. Enter the crypt. Turn left and approach the table. Take the large gear. Return to the hall. Go to the cabinet in the left corner and find another gear on one of the shelves. Now go to the other cabinet to the right of the altar. Knock out the next bandit and take the cogwheel and first aid kit from the closet.
Return to the gearbox. First, remove all wheels from the spindles. You should have two large gear wheels and four small ones.
Place the large wheel on the left spindle in the center of the gearbox and the small wheel to the right of it. Place another small wheel above another similar wheel. Install the next small wheel to the right of the last installed wheel. Then install the large wheel and the small wheel slightly lower. Pull the lever to the right of the gearbox to open the gate closing the entrance to the basement.
Now controlling Sophie, go down the stairs and deal with the two bandits standing in front of the open gate. Go down to the basement, where you will meet Robert.
Now it's time for Robert to lead Sophie. Together with Sophie, open the door and go into the tunnel. Take the first aid kit from the barrel to your left. Kill the first bandit, then follow the tunnel until you meet the second bandit. Having neutralized it, go further along the tunnel until you hear a conversation between two bandits. Turn left and, together with Sophie, neutralize them. Explore the crypt next to the place where you met with the bandits and find an artifact - the Seal of the Temple. Continue along the tunnel to your meeting point with another bandit. Having neutralized it, examine the crypts closest to you for the presence of a box. Move the box and take the second artifact, the Seal of the Temple. Go to the end of the tunnel and look at the electrical box on the wall to the right of the grate. There are four buttons that you need to press in a certain sequence.
Click on the buttons:
If you pressed the buttons in the correct sequence, the green light on the box should light up. Push the lever next to the box to raise the grate. Come into the room. Take the last third artifact from the table and the first aid kit next to it.
Follow the tunnel in the opposite direction until you meet a bandit on the way. After you deal with it, look for a switch on the left wall, with which you can open a passage to a small room where you have to solve another riddle.
Insert the three artifacts into the empty slots. Now, by rotating them, you must set the seals to a certain position. There is an arrow on the seal itself. There are three dots around each niche in which the seals are inserted. Let's take the clock face as a guide. Let's designate these points as 12 o'clock, 3 o'clock and 9 o'clock. Then you need to direct the arrow on the seal to the next position.
From left to right:
10 hours 4 hours 12 hours 2 hours
Return to the square in front of the church. Approach the stone column in the center of the square and run around it in search of an open cache. Take the second metal plate with symbols from the cache. Enter the church and follow the hall where the holy relics are located. Find the shield near the wall at the back of the crypt. Use both symbol plates on the shield. Find holy relics on the floor of the hall, marked as "Dark Image". Explore them. You will receive a diagram and a shield with the inscription from strange characters, which you must decipher. Look at the symbols on the shield and find the corresponding letters from the letter to the left of the shield.
You should get: "Richard"
Enter inventory. Select Cryptex 3 and type the word "Richard".
In the next game episode, Robert must escape from Silas, who is chasing him in a tunnel. Get to the nearest locked door and knock it down using the movement buttons. Run to the grate closing the passage. There is a switch and an electrical box on the wall next to it. Open the box and click on the following buttons
Press the switch and go forward. Knock down the next door and go further along the tunnel until another barrier in the form of a grate blocks your path. Work with the electrical box (the same combination) and lower the switch to the lower position. The grate will begin to rise, but, unfortunately, it will get stuck in the middle of the path, without completely freeing the passage. Finish the process of lifting the grate manually and move forward. Lift two more bars and unlock the last door. Go into the room and watch the final video of this chapter.
Chapter 8 – Westminster Abbey
First, look at the map of the abbey in the center of the hall. Then go to the statue to the left of the main entrance. Find the symbol on the pedestal. Examine the statue and find gold coin. Turn around and run forward until you see an alcove on your right. Turn right and go into the hall, the entrance to which is covered by a double-leaf grate.
Push the cart with the lighting equipment into the puddle when the guard is standing in it.
Go to the wall opposite you and examine the sculpture. Find the Sun Orb. Go to Newton's grave. Examine the symbols at the base of the grave. Use the ring on the Fleur de lis and take the sun orb. You now have a scroll with five poems:
The father of the English poems of yore,
Whose Canterbury tales held moral core,
Clockwise around a shield stops the name,
Of he who can absolve your sin and shame.
Though many tried his words defined the rose,
In iambs writ" this man of loves and woes,
A word you"ll find that lies within the prose,
Which here denoted grants a ring repose.
The first child King of England made this place,
Where now he rests inside confessor's grace,
The bard's denoted word will help you find,
A way to help release a King of kind.
The cousin of the Queen Elizabeth,
In Somerset the Baron lost his breath,
His mother with a Soldier ran away,
But not before the Knight had made her day.
Think back on all that you have now observed,
And find the knight with whom you first conferred,
He seeks the orb that ought to be on his tomb,
But only if the seed lies in its womb.
Each poem contains a specific riddle that the player must solve on the way to the main goal. Let's start with the first poem. Return to the main hall, where you will find Chaucer's grave. Examine the circular engravings at the top of the sculptural composition. Then move your gaze to the base of the grave. Click on the shield tile. Use the sun ball on the plate with the shield. You can now move the letter tiles around your work surface. Place "Pardoner" from left to right clockwise and take the large ring from the cache.
Now let's begin to solve the second poem. You need to find Shakespeare's grave. Approach the tarpaulin-covered area to the right of Newton's grave. Read the sign in front of the tarp. From it you can find out that the Shakespeare sculpture is in the restoration hall. Go into an alcove with two doors. Go through the wooden door that is located to the right of the entrance to the hall with Newton's grave.
Walk forward a little and take cover behind the boxes. Wait until the guard stops under the lamp. Untie the rope from the load and the lamp will definitely land on the guard's head. Take the first aid kit from the niche next to which you are currently standing and leave the shelter. Get to the end of the passage, open the door and go into the complex of restoration rooms.
Go along the corridor to the hall in which the sculpture you need is located. Along the way, fight numerous guards. In the hall, find the Shakespeare sculpture and examine it. It's too dark here to see anything specifically. Go out into the corridor. Enter the small room through the door to your left. Look behind the door and flip the switch on the electrical box. Take the first aid kit and go out into the corridor. Return to the Shakespeare sculpture and examine it. The scroll held in the sculpture's hand is overgrown with mold. You will have to find some cleaning agent to be able to read the text.
Return to the main hall. To the left of Shakespeare's tarpaulin-covered grave is a cabinet. Open the closet doors and look at the work coat. Move your robe to the side and take the brush from your pocket. Also, don't forget to take the first aid kit from the bottom drawer. Return to the restoration room. Look behind the door and examine the pallet of boxes. Open the box closest to the wall and take the wire cutters from it. Then examine the two boxes covered with blue tarps that are located to the left of the front door. Take Da Vinci's manuscript from the top drawer.
Now return to the main hall door. Turn left and go to the far door, which has a padlock on it. Use wire cutters to cut through the lock shackle and go into the closet. Slide the box off the pallet and press the switch to illuminate the pantry. Take a container of cleaning product from the shelf.
Go to the restoration room. Go into inventory and combine the cleaning agent with the brush. Use the brush on the dirty scroll in the sculpture's hand. After Robert finishes reading, examine Shakespeare's finger. Place the large ring on your finger and take the handle from the opened drawer at the base of the sculpture.
Go to the central hall. Find the tomb of King Henry III. Examine the hole in the center of the circular engraving. Use the handle into this hole. Place the word "temples" in the windows and take the tile with the crown (king).
Behind you, near the wall, is a mobile stepladder. Release the brakes from the wheels and move the stepladder to the side. Use the wire cutters on the padlock of the gate and enter the chapel. Explore Baron Hunsdon's grave. Place the crown tile in the center of the puzzle.
Click on the tiles in this order:
- Queen
- Baron
- Knight
- Soldier
Take the cylinder unusual shape.
Return to Newton's grave. In your inventory, combine the cylinder with the sun ball and insert the resulting object into the hole at the base of the grave. Use the scroll piece from your inventory with the scroll that is in the drawer. After this, a work area will appear on the screen, on which pieces of the picture are chaotically mixed. Rearrange the pieces so that you get an original painting.
After solving this problem, Lee Tibbing will appear before you with clearly bad intentions. Listen to Tibbing's long monologue. When he stops talking, it's time for Sophie to interject. After voicing Sophie a line that you must select from the list, you will have the opportunity to work with Cryptex 3. You must set “Payens” on the center line. You are given approximately 15 seconds to type, which naturally is not enough to type out the entire word. You will have three more attempts to complete Cryptex 3 and continue playing.
Correct lines:
- “I thought you told us that only the worthy could find the Holy Grail.”
- "You are responsible for my grandfather's death"
- "You are no better than this church"
- "...and now the church has accepted you"
If you solve this problem quickly enough, you will be forced to watch a very long dialogue between all the characters in this game.
Chapter 9 – Rosslyn Chapel
Turn around and go into the chapel hall. Examine the pedestal to your right and take the stone cover. Examine the wooden chest opposite the podium. Note the footprints on the floor next to the chest. Move the chest away from the wall. Go to the wall near which the chest stood and look at the floor. Lift the slab and take the disk with the image of a daisy from the hiding place.
Return to the main chapel hall. Approach the red curtain on your right. Pull the cord to move the curtains. Explore the empty space in the center stone slab. Use the stone lid on the empty space. Take the disk with the image of a lily.
Explore the sculptures of four angels near the entrance to this hall. Find the "Faith" angel and take the matches from the mantel underneath this sculpture. Approach the red curtain on the other side of the hall. Pull the cord to open the curtains. Use the matches on the candle to your left. A sign with an inscription will appear before your eyes. Robert will translate the Latin inscription.
Go behind the altar and approach the central chest of drawers standing near the wall. Open the bottom drawer, take the magazine and read the magazine.
The following text is valuable to you:
Daisies represent innocence
Lilies represent purity
Sunflowers represent adoration
Roses represent love
Return to the angel sculptures. Explore the angel of "Truth". Pick up Sophie and she will find another disc with a rose on it on top of the sculpture.
Approach the gate. Apply useful log information to determine the location of each drive.
- Innocence – Daisy CD
- Purity - Disc with the image of a lily
- Love – Disc with a picture of a rose
Go downstairs. Explore the stone memorial and Robert will translate the Latin inscription.
Go to the far side of the room. Explore the globe. Spin the ball to see the void where England, Scotland and Wales should be located. Enter the narrow passage to the right of the stairs. Investigate the Bleeding Angel. Take the missing element from the globe and return to the next room. Insert this item into the globe and take the medallion that was hidden inside the globe
Go through the narrow passage and enter a room littered with various rubbish. Move the pallet of boxes to the side to reveal a hatch in the floor. Find a recess in the floor near the hatch. Insert the medallion into this recess. Open the hatch and go down to the secret library. Explore the fresco. Go to the far right corner of the library, littered with chairs. Find Da Vinci's manuscript on one of the chairs. Go to the left corner of the library and examine the photo album. Watch the final video of the game.
The game is non-linear.
Interface
Right mouse button - inventory and exit to the menu.
Above the item slots is a document folder into which you will add Leonardo's letters and clues found during the game. You can scroll through the pages in a folder by clicking on the arrows.
In the upper left corner there is an indicator of decency (the ratio of bad (red scale) and good deeds (white scale)). If a balance is maintained between bad and good deeds, then you have the opportunity to choose the game scenario. Below the indicator is the number of points scored (they are given for ingenuity and completing tasks). The game has many optional tasks with which you can score points. Every 10 points scored can be exchanged for raising the level on some scale. If you start the game with unseemly actions, the red scale is automatically replenished, and vice versa.
In the upper right corner is a portrait of your character. If you find clothes and click them on the portrait, the character will change clothes.
Under the portrait is a journal with current tasks and a wallet.
The "compass" icon - exits to the menu where you can save or load the game.
The lower icon “sun and moon” is the exit from the inventory.
Hand - take, gear - apply. The crossed out gear is the active point on which you need to apply the item.
September 22, 1522
After the introductory video, go to your inventory and open the document folder. You will play as Waldo, a young artist and student of Francesco Melzi, who in turn was a student of Leonardo da Vinci. An unknown landlord has sent you to the Château du Cloux, owned by King Francis I, to retrieve the missing manuscript of Leonardo da Vinci. Now Marie de la Bourdassiere lives in the castle, for whom you have a letter of recommendation (it is in your inventory). Click on the letter - Waldo will comment: "Are you virtuous enough to give it to Marie without reading it?"
Open the magazine: your first task is to find Leonardo da Vinci's study. This can be achieved in two ways.
Leave the room and go down to the first floor. Steps lead to the street, ahead is the entrance to the kitchen.
Optional task: pour milk for the cat.
Take a bottle of milk on the kitchen table near the wall and pour it to the cat (bowl on the floor). The bowl is active only on the first evening.
The first way to get into Leonardo’s office (illegal, affects the increase in the red scale in the integrity indicator):
Go outside, walk along the castle wall and look up (you should be standing near the rose bush). At the top is the active point (crossed out gear). Return to the door and take the ladder near the wall. Place it under the window (you need to select the stairs in your inventory, close your inventory and apply the item to the active point). Climb up, but the ladder will break.
Go to the house. Turn right into the kitchen, and from there turn right into the dining room. A door in the far corner of the dining room leads to the workshop. It's dark here, but there's a candle burning on the right. Someone forgot a stick near the table on the right wall, pick it up and go to the sawmill. Place the stick in the vice (on the table) and press the pedal (under the table). Immediately push the stick to guide it under the knife (the pedal should spin). Take the crossbars, use them to repair the stairs (sticks on the active points on the stairs) and climb into the window.
You will find yourself in someone's bedroom. Go to the door on the left and find the active point - this is the key in the lock. Turn the key once to open the door and press the handle (if you turn the key twice, you will lock the door again). Enter Leonardo's office.
The second way to get into Leonardo’s office (legal):
To do this, you need to go up to the second floor along the stairs next to the kitchen and turn right. On the stairs, pick up a necklace that is missing a stone.
You will find yourself in the library. Leonardo's office is behind the locked door to the right of the fireplace. Take the mirror from the Venetian chest of drawers with multi-colored patterns. Take a piece of paper and a charcoal pencil from the bedside table (the second pencil is on the table in your room). Place the sheet of paper in a folder and notice that text is imprinted on the page. From the slot on the right, take a charcoal pencil and shade the piece of paper, then read the text using the mirror (the text can be moved using the arrows). It turns out that the key to Leonardo’s office is hidden in a hiding place pointed out by John the Baptist. Leonardo also lost the key to his cabinets, but everything he needs can be found “at the foot of the sacred fire in the house of dreams.” Turn the page. Using a mirror, read the illegible inscriptions under the astrological signs on the piece of paper (symbols of Fire, Air, Water and Earth). Pay attention to the paintings in the bedroom. One of the paintings is called "Saint John the Baptist" and he points his finger up. Click on the upper right corner of the picture frame and take the key.
Walk around the bed and look at the canopy. You should see the astrological sign of Fire.
Automatically you will look at the carpet on the floor. Go to the kitchen and take the knife from the table in the center of the room (the second knife is in the table drawer in your room, where the charcoal pencil is). Unroll the carpet and use a knife to lift up the floorboard. Inside there is a key blank and a sheet of paper with a recipe for making bronze keys and gold coins. Open the door and you will find yourself in Leonardo's office.
Optional task: open the envelope with the letter.
There is a green table by the fireplace. Place a letter for Madame Bourdassiere on it and use the knife (which lies on the table) to open the seal. Read the letter, then click on the side pages and collapse. Now you need to restore the wax seal. There is a splinter on the table next to the knife. Light a splinter in the fireplace (you need to turn around) and light a candle on the table. Take red sealing wax, bring it to the candle, and then to the letter. Take the letter.
Go to the window and pay attention to the portrait of Leonardo. Click on it and take out a piece of paper that you need to put in the folder for papers.
Look at the leaflet. This is a “live” puzzle in which you need to connect a clock and a separate gear using gears (at the bottom of the sheet). Click on a separate gear (it will start rotating) and place a second gear on it so that it also starts rotating. Then attach the third gear, etc. One of the solutions:

If everything is correct, the clock will go clockwise and you will see a video.
September 23, 1522
You will find yourself in the courtyard and meet Saturnin, Madame Bourdassiere's servant.
(If you took the stairs the day before, he will hint that he knows about the night's adventure, but is ready to forget it for a small bribe. Open your inventory, take the coin and give it to Saturnin.) The servant will explain that Madame recently returned to the castle, but to get into her room, you need to give some gift. He will also advise you to explore the park in which Leonardo did not have time to build a fountain.
Go find Madame Bourdassiere. If last night you climbed up the stairs into Leonardo’s office, then you need to go up to the second floor, turn right and open the door to his office from the library side (see in the previous chapter the second way to get into the office). If you have already opened the door, go to Leonardo's office.
Madame Bourdassier stands on the threshold. She wants you to build a fountain and also fix the bridge. Madame will give you a plate with an engraving made by Leonardo. Look in the inventory and pay attention to the portrait of Waldo - Madame Bourdassier appeared behind him, who now has her back turned to you. This is an indicator of trust, because... As you complete tasks that she likes, she will turn her face. When she puts her arm around Waldo's shoulders, you will be given an ending choice at the end of the game.
Go down to the workshop and go left to the large press (Waldo will comment that you need paper to print an impression from the plate). Above the fireplace hangs a piece of paper with another instruction from Leonardo, but your character will refuse to pick it up without the proper tool.
Look around the room. There are two doors in front of you: the left one leads to the dining room, the right one leads to the corridor. Take the pliers from the nightstand to the right of the right door (the second pliers hang on the back door). Note that there is a faulty jack next to the nightstand, and next to it there is another plate (which also needs to be imprinted). Remove the leaf with pliers (at the same time there will be a nail in your inventory) and examine it in your inventory.
This puzzle is as "alive" as a clock, and is a fountain project. You can move three tubes, two flasks, a press (1), a jack (2), a pump (4) and start the machine itself (3) to check the result.
First, install the flasks (downwards - a flask with two holes, up - with one). Connect the flasks with tubes. Lower the press down, then attach the jack to the car. Click on the machine and then on the pump. If everything is correct, you will see a video (if you are wrong, water from the machine will flood the drawing).

Waldo will decide to ask Saturninus if there is a device for a fountain in the castle. Go down the back door to the street. Where the servant stood, the door to the barn opened. Go inside and talk to Saturnin, who will confirm that he has the preparation. Take it (to the left of the servant there is a gray structure against the wall) and go outside. Place the fountain in the center of the pool in the courtyard and listen to Madame Bourdassiere's praise (if you look in your inventory, she will turn slightly to face you).
Go outside and explore your surroundings. If you walk along the path, you will see a broken bridge. Note that the left gate has a gear, but the right does not. Return to the workshop. Someone left a gear near the press. Take it and go to the drilling machine (near the sawmill). Place the gear under the drill and turn the handle. Having made the hole, return to the bridge and try on the gear on the right collar - it doesn’t fit; you need a larger drill. Return to the workshop, go to the fireplace and take the drill (lying on the right on the mantelpiece). Change the drill in the machine (the small one must be removed and the large one installed) and drill the gear again.
Return to the bridge and place the gear in the right gate. Remove the iron bolt from the left gate (it will automatically be in your inventory). Turn the right gate and go across the bridge to the dovecote. Climb the stairs, turn to face the window and take the decoy from the cell on the left (next to which lies a yellow bundle of straw). Raise your head and use a decoy on a pigeon. You need to press the decoy holes so that all the pigeons stick out of the cells. The correct order (from left to right): 4, 3, 5, 1, 2. Then examine the pigeons and find a letter from your renter.

Return to the bridge and turn the right gate again. Go to the island to the mill. (The second way to get to the mill is to use the ladder on the water between the dovecote and the mill. In case you step on the ladder and break it, see the first way to get to Leonardo's office in the previous chapter.)
Please note that the mill wheel does not work. Walk back to the bridge, turn right and go forward to stand in front of the dovecote. Use a knife to cut the reed that will serve as your breathing tube. Return to the mill, stand at the door and turn left. You should see the mill wheel. Put the breathing tube on Waldo and follow the arrow into the water.

Find the logs in which the mill wheel is tangled and use the knife on them. The wheel should spin.
Return to Saturninus and tell him that you repaired the bridge and unlocked the mill wheel. In response, he will tell you how to prepare the paper: you need to grind old rags moistened with water, and then put them under a press. Ask how to appease Madame Bourdassière: he will answer that she loves perfume. The barn is still open, and Saturnin is ready to sell you something from the items lying on the table to the right of the door. Now on the table there is a bronze block for making keys, two sheets of paper, a bowl of sugar and thread. You can buy all these items by pointing them to Saturninus, but then you will run out of money, and you will have to do them after first getting gold.
Return to Madame Bourdassiere and tell her that the bridge has been repaired (her figure in the portrait will turn a second time). She will be happy and want to sing. Turn left towards the window and take the lyre. Madame will begin to sing, and you will need to repeat the melody by pressing the strings of the lyre in the correct order. Play like this (strings from left to right): 1, 2, 3, 4, 2, 2, 1. If you play correctly, then the notes on the staff are black, if incorrectly, they are red.

After this, Madame Bourdassier will declare that she has lost her voice, and Waldo will decide to prepare a potion for her. Saturninus' help will be needed.
The servant will tell you that the syrup consists of honey, thyme, lemon and water. Honey can be found on the way to the dovecote. Go to the dovecote and examine the beehive standing by the road. When you touch him, Waldo will refuse to take out the honeycombs without protection from the bees.
Return to the mill and remove the protective mask from the wall. Grab a pair of gloves on the table. Near the entrance you need to take some dry leaves that will be needed for the smoker. Look into the workshop and take the flint from the mantelpiece. Go to the hive, open your inventory and put the protective mask on Waldo. Open the smoker, which stands to the right of the hive, put dry leaves in it and set it on fire with a flint. Use the smoker on the hive, then remove the lid and place it on the stool on the left. Take out the honeycomb and go to Saturninus. He will agree to make honey.
Lemon and thyme lie in the kitchen, on the nightstand near the window. A decanter of water stands on the table in the dining room. In the future, for production various items you will constantly need water, which you can get from a fountain or river. Return to Saturninus and take the honey from him (if he doesn’t give it back, walk a little or just wait and change location).
Go up to Leonardo's office to his desk (in the candle-lit corner). There is a distillation cube nearby. Remove the coil from the pot. Place thyme, honey, lemon in a pot and pour water from the carafe. Open the stove door - you need some fuel. Go to the back door and on the first floor take it from the bag on the left by the stairs charcoal. Place the coal in the stove, light it with a flint and close the door. Go to the table near Madame Bourdassiere, take the cup and use it on the pot. Give the cup to Madame, after which she will invite Waldo to her chambers. The figure behind Waldo will turn a third time.
(On Leonardo's desk there is a bottle of sleeping pills on one of the shelves. If you add it to the syrup, Madame Bourdassiere will fall asleep and you will not be able to immediately get into her chambers. Do other tasks - print plates and make paper, and then return to Leonardo's office).
You will learn that Madame Bourdassiere found two drawings by Leonardo and a broken spyglass, and Waldo's room used to be the room of Salais, da Vinci's lover. Examine the telescope (on the right by the window) - it looks like the lens needs to be changed here.
Exit through the bedroom that is already familiar to you (if you used the stairs the day before, you climbed into it) and go to the green table in Leonardo’s office. Open his drawer and take out the monocle and sanguine. Return to Madame Bourdassiere's office and approach the spyglass. Press the cover on the body with some sharp object (nail or knife) and remove the cracked lens. Place a monocle instead and look through the eyepiece. You will see Saturninus hiding a boat on the shore. Madame Bourdassier, having learned about this, will send you to bed.
Optional task: Make rose oil for Babu. Affects the choice of ending at the end of the game, because this is one of the indicators of Babu's favor towards Waldo.
You will need flint, coal, roses (you need to cut them with a knife or pliers), a whole decanter of water (if you run out, get it from a fountain or river). The perfume recipe is on one of the pages in the paper folder, in the same place as the vodka recipe (you can hover your mouse over the coil in the inventory - the recipe is repeated there).
Go to the workroom and remove the coil. Place the roses in the pot, pour in water, and put the coil in place. Pour the remaining water into the bell above the still. Place the coal in the stove, light it with a flint and close the damper. Waldo should say that everything is ready. Take the empty bottle from the table in front of the sofa and use it on the flask of the distillation cube.
This is a complete step-by-step walkthrough with hints, tips, tricks, solutions and answers for the iOS, Android and PC puzzle adventure game, The House of da Vinci, by Blue Brain Games. Feel free to ask for extra help in the comments section.
Chapter 1 – Street:
You can watch my walkthrough video for chapters 1 & 2 here or continue to the step-by-step walkthrough below:
1. Follow the tutorial. Look around, then double-tap the guard to zoom in on him. Double-tap on the scroll and then pick it up. Open your inventory to look at it. Pull the ribbon off the scroll by swiping to the left. Then unwind the scroll and read it.
2. Continue with the tutorial. Double-tap on the door to the left. Zoom in on the bell. Rotate the top piece and then the bottom piece. Pull the chain to ring the bell and take the key piece.


3. Zoom in on the top of the mailbox and slide it apart to get the other part of the key.

4. Combine the two key parts, slide them together and rotate to make the key.

5. Zoom in on the mailbox. Slide the square piece to the left to reveal a keyhole. Insert the key, turn it and then take the Oculi Infinitum from inside.


6. Slide the Oculi Infinitum up and look at the door. You can now see the mechanisms inside. Rotate the three pieces so the pentagon cutouts meet in he center. The door will open. Watch the cutscene, then push the door open and go inside.

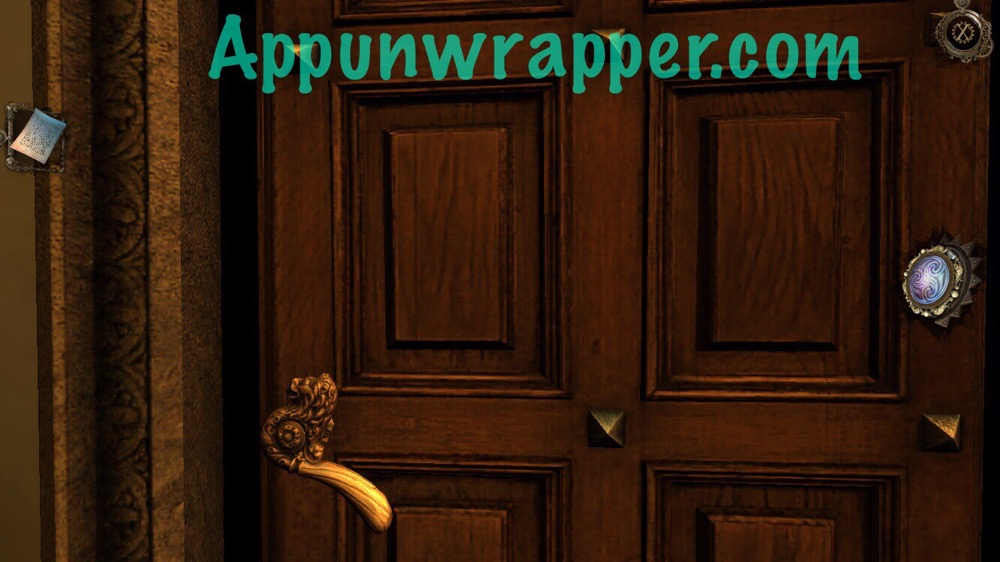
7. Head up the stairs. Turn the lion-headed door handle to open the door. Push it open and go through to complete the chapter.
Chapter 2 – Library:
1. First, examine the lamp post. There's a scroll here. Slide the scroll seal off and read the scroll.

2. Look at the seal in your inventory. Rotate the middle piece so the two arrows match up. You'll now have a three-spoked seal.

Sorry guys. This game is too big. I’m just going to be posting videos with the occasional screenshot from here on. I might add more later, but for now it made more sense to just focus on making videos.
Chapter 3 – Workshop:
This is the crumpled note that has the clues for the globe:

For the globe model tower puzzle where you have to conquer the world, always go for the smallest number available first. Otherwise you'll lose. But you can always restart that section by making a few wrong moves to reset everything.
This is the exact order to attack in:
Round 1 (Sardinia): 14, 29, 32, 19, 38, 77
Round 2 (Italy): 20, 28, 30, 47, 58
Round 3 (Africa): 100, 123, 46, 143, 34, 300, 55, 351, 512, 790
Chapter 4 – Courtyard:
NOMEN ILLI MORS is Latin for His Name was Death.
This is the correct order to press the buttons at the base of the door:

***
Note: Sometimes a promo code is provided for a game, but it does not affect the review in any way. At AppUnwrapper, we strive to provide reviews of the utmost quality.
If you like what you see on the site, please consider supporting the site through Patreon. Every little bit helps and is greatly appreciated. And as always, if you like what you see, please help others find it by sharing it.
COPYRIGHT NOTICE © AppUnwrapper 2011-2018. Unauthorized use and/or duplication of this material without express and written permission from this blog's author is strictly prohibited. Links may be used, provided that full and clear credit is given to AppUnwrapper with appropriate and specific direction to the original content.
This is a complete step-by-step walkthrough with hints, tips, tricks, solutions and answers for the iOS, Android and PC puzzle adventure game, The House of da Vinci, by Blue Brain Games. Feel free to ask for extra help in the comments section.
Chapter 5 – Crypt:
Chapter 6 – Armory:


Here’s just the emerald maze puzzle:
Chapter 7 – Tower:
Here are the shapes from the paper. The puzzle itself is easy, but in case you forget the order, here they are.

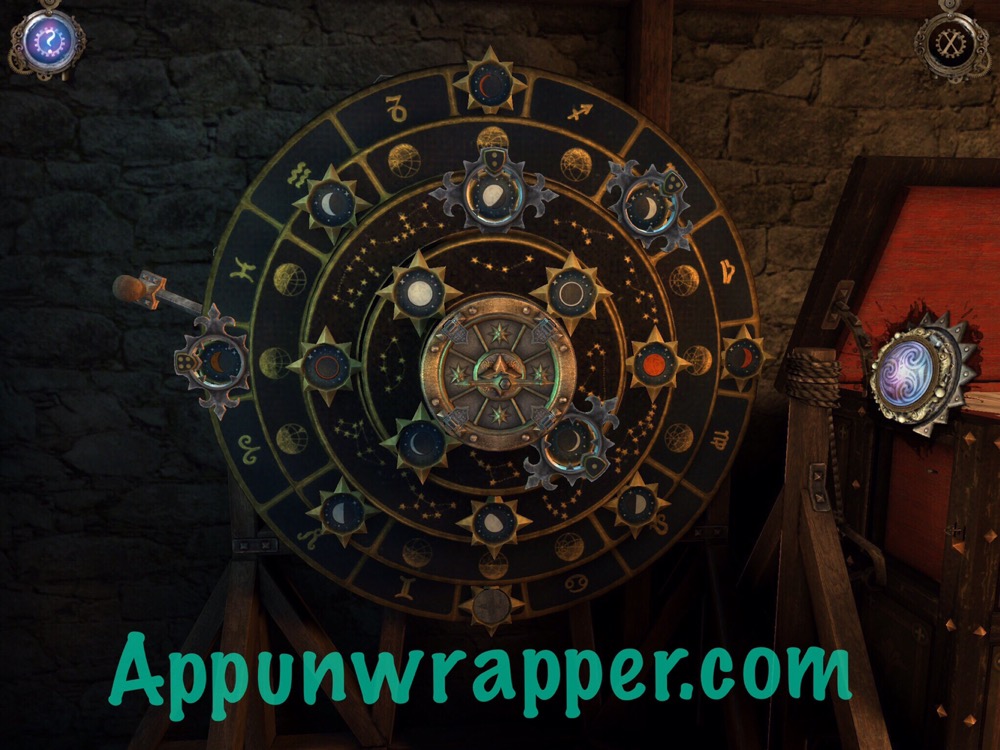
And this is the first moon phase puzzle:


After you solve that, you’ll need to spin the hands on the Astrolabe to try and stay in tune with the moving tiles. When the symbols glow, that means you’re doing it right. But you need to follow the tiles and keep the symbols glowing long enough to clear it. It's not easy, so just take your time with it.
This is the second moon phase puzzle:

Here’s just the sliding block/tile puzzles:
And here’s the full chapter:
Chapter 8 – Time Machine:

Count the different shapes here. You get 8 tetrahedrons (pyramids), 2 of the diamond-like shapes, and then 4 of the nearly spherical shapes.

Match those to the symbols next to them here:

And then use that information here:


For the boiler, you need to pump it and then pull the first three levers in this order. The third lighter will fall off. It’s upstairs, but before getting it you need to pump it and light the first two again. Once you replace it, the rest goes like this:

Here’s the water level puzzle:
And here's the video for the whole chapter:
***
Note: Sometimes a promo code is provided for a game, but it does not affect the review in any way. At AppUnwrapper, we strive to provide reviews of the utmost quality.
If you like what you see on the site, please consider supporting the site through Patreon. Every little bit helps and is greatly appreciated. And as always, if you like what you see, please help others find it by sharing it.
COPYRIGHT NOTICE © AppUnwrapper 2011-2018. Unauthorized use and/or duplication of this material without express and written permission from this blog's author is strictly prohibited. Links may be used, provided that full and clear credit is given to AppUnwrapper with appropriate and specific direction to the original content.
The walkthrough is relevant for all versions of the game
Gameplay Features
In this first-person puzzle game, all controls are done using the mouse. More details about the mechanics of the game will be discussed in the text of the walkthrough.
Menu from the game is opened by clicking the left mouse button (LMB) on the X-shaped icon in the upper right corner of the game screen. The menu has a standard set of options.
Inventory located on the left side of the screen and is constantly open for viewing. On the right side of the screen are objects invented by Leonardo, which will be needed to interact with objects in the game.
Preservation the current state of the game occurs automatically when you exit it.
Note. To enlarge the screenshot, click on it in the text of the walkthrough. To view additional screenshots, click on the active links highlighted in the text of the walkthrough in dark red.
Florence, 1506
Prologue. Street
At the beginning of the game we go through detailed training gameplay, i.e. execute the commands whose text appears in the upper area of the screen.
We turn to the right of the guard: hold down the LMB and move the mouse to the left.
We approach the guard: double-click LMB on the guard.
We bring our gaze closer to the scroll in the guard’s hand: double-click LMB on the scroll in his hand.
We take the SCROLL in our “hands”: click on the roll of LMB (the scroll is placed in the inventory).
We examine the scroll: click LMB on the SCROLL in the inventory window.

We remove the seal: hold LMB on the ribbon encircling the scroll and pull it to the right.

Expand the scroll: hold down the LMB on the scroll, move the mouse up.
We read the text of Leonardo's letter: hold down the scroll with LMB and pull it up to read it completely.
Exit the approximation: click on the icon in the upper right corner.
Task: get to Leonardo's library
Move away from the guard: click the right mouse button (RMB).
We approach the door on the left: double-click on the door.
We bring our gaze closer to the door bell, to the right of the door: double-click the LMB on the door bell.

We install the groove in the upper part of the bell on the crossbar of the bracket: hold LMB on the upper part of the bell, move it counterclockwise.

We extend the chain: hold LMB on the bottom of the bell, pull it to the left.
We ring the bell: hold LMB on the extended chain and pull it down.
We bring our gaze closer to the opened stand: double-click on the lowered stand.
Take the KEY PART: LMB click on the object on the stand.
Move away from the bell: click RMB.
Let's look at the mailbox: double-click LMB on the mailbox under the bell.
Open the lid: hold down the LMB on the lid above the mailbox, move the mouse to the right.
Take the second PART OF THE KEY: click LMB on the object on the stand. We click LMB on the first part of the key, on the window of which there is a “+” sign and part of the key slides out in the center of the screen.
Move the second part of the key to its first part: click LMB on the second part of the key.

We connect both parts: hold down the LMB on the second part of the key, move the mouse to the left.

“Screwing” the KEY: hold down the LMB on the key, move the mouse up.
Move away from the top of the mailbox: right-click.
We bring our gaze closer to the rectangular plate on the front side of the box: double-click on the plate.
We open access to the keyhole: hold LMB on the plate, move the mouse to the left.
We insert the key into the keyhole: hold LMB on the KEY in the inventory, drag it to the keyhole.

Turn the key in the lock: hold down the left mouse button, move the mouse to the left.
Open the mailbox door: automatically, moving away from the mailbox, hold down the left mouse button on the slightly opened door, and move the mouse to the right.
We bring our gaze closer to the inner surface of the box: double-click on the inner surface of the box.
We take the “Oculi Infinitum” - a lens invented by Leonardo (it is located on the right side of the screen): click LMB on the object in the box.
Move away from the box: right-click.
Take the lens for use: hold down the LMB on the lens in the objects window on the right, move the mouse up.
The automatically installed lens brings our view closer to the internal structure of the door lock.

Open the lock: hold the LMB on each of the three gears in turn, move the mouse, directing the groove of each gear to the pentagonal axis of the lock in the center. We automatically move away from the lock and the door is open.
The character turns to the guard, who points somewhere to the right. He turns his gaze to the tower, illuminated by emerald light. We see an explosion occur inside the tower. Soon a man with mechanical wings flies out of the opening and falls behind the Teacher's house.
We open the door and go inside.

We follow the corridor and go up the steps. We look closer to the door handle, turn it and open the door. We open the door and go inside. Exercise done.
Chapter first. Library

Let's take a closer look at the lighting stand in the center of the room. We remove the seal from the scroll lying on the stand. We receive the SCROLL SEAL. We unfold the scroll and read the text of Leonardo’s message.
Task: find a secret passage
Bust

We move away from the counter and look to the right. We approach the stepladder and climb up it. We take it from the shelf drawing .
- We get achievement "Printing Press" .
We return to the center of the room, look to the left.

Let's take a closer look at the warrior's bust. We move the flap on the stand, opening access to the recess. Click on the SCROLL SEAL, placing it in the center of the screen. Rotate the inside of the seal and pull out the three petals. Insert the THREE-POINTED SEAL into the recess under the bust and turn it counterclockwise.
We automatically move our gaze to the opened eyes of the bust.
Alternately click on both eyes.
The helmet on the warrior’s head opens slightly.
We move the helmet aside and automatically bring our gaze closer to the puzzle.

Rotating the central circle with the groove, we slide the plates with colored stones into it, moving them to the groove in the outer part, where the stones of the same color are located.
A drawer handle appears under the bust.
We pull out the drawer and take the glove.
The glove is automatically put on the character's right hand. The lens is placed in a special compartment on it.
We bring our gaze closer to the inner surface of the warrior’s tilted helmet. We look at the gold plate using the lens (pull up the lens located on the right side of the screen). We lower the gears down, rotate them, pushing the doors apart at the bottom.
A secret compartment opens.
We take out from the recess a PATTERN FROM VALUABLE WOOD and a PIECE OF WIRE.
Move away from the bust (two RMB clicks), look at the box under the bust. Let's look closer to the bottom of the box on the left side. Move the plate aside and insert a PIECE OF WIRE into the groove. With its help, we open the drawer, in which we find a PART OF WOODEN PATTERN. Let's take a closer look at the bust stand in which we opened the drawer. We look at the lower left corner.

Place the WOODEN PATTERN PART on the empty space. Move parts of the pattern to the center,
A panel opens out of a hidden compartment and contains a stand for storing screws.
Rotate the stand and remove it from it. COPPER SCREW. Moving away from the bust.
Light stand
We look closer to the stand on the counter. In the inventory we take the PATTERN FROM VALUABLE WOOD, turn it reverse side, and apply a COPPER SCREW to it. We rotate it, we get a WOODEN ROSE. We install it in groove on the counter.
Panels open on all four sides of the rack. We automatically move to the beginning of the puzzle.
Holding the WOODEN ROSE, which acts as a slider, we move it along the opening grooves so as to guide the rose into top part:
→ 5 2← → .
The rose moves to the second panel.

Here we continue to move the rose along the grooves, while moving the squares with them along the guide wires (the square on which the rose is located cannot be moved), we build a road to the bottom of the panel.
Move the rose down.
We move the two plates of the second row to the right, and move the rose to the third row. We move the two plates of the fourth row to the left.
Move the rose down, left and down one square.
We move the plate of the next row to the left, moving the rose into the hole at the bottom of the panel.
Rose moves to the third panel.

This is where circles with grooves are added (squares with circles do not move) that can be rotated to move the rose towards the top of the panel.

Move the rose up two rows.
Rotate the circle of the first row and the circle of the third row.
Move the rose up to the right, two squares down, and two squares to the left.
Move the rose up four rows, turn the circle to the right.
We move the rose to the right column and move it one square up.
We turn the circle of the top row and bring the rose into the hole.
Rose moves to the fourth panel
In this panel you need to use all the combinations from the previous panels. Move both plates of the top row to the right.

Move the rose one square down.
We turn the circle of the bottom row, move the rose to the right, down and left.
We turn the circle to the right, move the rose to the right and down two squares.
Turn the circle to the left.
Move the rose left two squares and up one square.
Rotate the circle on the right and the circle on the bottom.
We place the plate of the second row from the bottom in the central column.
Move the rose to the right and two squares down.
We turn the circle below, move the rose down and to the left.
Rotate the circle on the right and the circle on the bottom. We insert the rose into the hole.
When the ROSE reaches the end point of movement in the fourth panel, it opens its petals.
We take out the KEY.
The lighting stand is recessed into the floor. There is a polygonal recess at the top of the remaining part of the post
Bust

We turn our gaze towards the bust, looking at the top of the box underneath it. Insert the KEY, turn it counterclockwise, remove the SEAL WITH AN EXPENSIVE PATTERN. Let's look at the lighting stand.
Light stand
In the inventory we interact with the SEAL (pull out its top), we get a FITTED PAINTED SEAL. Place the seal in the polygonal recess and turn it.
A niche with crystals opens.

We rotate the crystals, forcing the beam to enter the wide lens.
The top of the rack closes. The beam coming out of the hole in the stand points to the bookshelf.
Book shelf
We move our gaze to the shelf with books. Take the LEATHER BOUND BOOK. We look at it in the inventory, turning the book towards us with the spine.

We move apart the parts of the spine, bringing our gaze closer to the text.
Leonardo writes about his invention "Okuai Tempos", with which you can look into the past and find a secret passage.
Let's take the invention.
"Okuai Tempos" is automatically installed in the compartment on the character's glove.
Room
We move away from the shelf and activate “Okuai Tempos”.

With its help we detect stains on the floor. We bring our gaze closer to them, circle them polyhedron outline(set randomly) and launch the “time machine”.

We move the slider left and right (rewind time “back and forth”) and remember what Leonardo pressed to open the door. Turn off the device, click on the ornament on the stand of the bookcase. Exercise done.
We push the shelving and leave the library.

Leaving the library, the hero manages to notice a figure on the balcony watching him.


