How to draw a beautiful map. How to draw a beautiful map of the territory. Mountains don't have to be beautiful. Inverted triangles will do the job perfectly.
Long gone are the days when it was enough to indicate your address and phone number on the contact page. Today, any company that values its customers must place a location map next to the address. This is very convenient, including from a UX point of view. Create simple map You can get directions using the Yandex.Maps or Google Map constructor. But sometimes you need something more complex - for example, a map may be needed for a presentation or to create infographics. In this case, you can use special online tools to create custom cards. Some of these tools allow you to create interactive maps that can present information in a user-friendly way. FreelanceToday brings you 10 free map making tools.
Animaps service expands functionality Google Maps, allowing you to create maps with animated markers. Markers move around the map, showing, for example, the route of movement. A very useful service for creating interactive infographics. Using Animaps, you can create a whole story about an event, accompanying it with text blocks and illustrations.
Easy to use, Scribble Maps has a variety of tools to create almost any kind of map. You can make a regular route map, but at the same time, the service can be useful for designers who would like to create colorful infographics. Scribble Maps allows you to add text, images, draw and color various geometric figures, place markers and much more. If you need infographics based on a map, you can’t think of a better tool. The finished map can be posted on a website, on a blog, or sent to a client by saving it in PDF format.
The creators of the MapTiler service made sure that user-created maps are displayed on any device. MapTiler is one of the most convenient applications for preparing tiles using the Google Maps API. Unfortunately, the free version of the program has very limited functionality, with which you can create only the simplest maps.
HeatmapTool is the best online tool for creating highly accurate heat maps. With this map you can quickly visualize data using different colors. The service allows you to control the radius, scaling and opacity of heat spots. Information can be updated in real time. Why was this service created? Primarily for visual display of any statistical data in a pre-selected region. You can make quite complex maps, for example, using the service you can show cellular network coverage, population density in the country and much more. The service is very powerful; it can be used to quickly process even very large volumes of statistical data.
After purchasing Nokia, Microsoft significantly improved its mapping service Bing Maps. Nokia maps have always been highly detailed and have good coverage, so you don't have to worry about accuracy. The functionality of the service cannot boast of variety, but there are quite enough tracks, markers and geometric shapes to create a fairly informative map. It is also possible to add images and text comments. After finishing the work, you need to save the result, after which Bing Maps will generate a link and code for embedding the map on the site.
The friendly user interface of the Click2Map service will help you quickly and easily create interactive maps of any level of complexity. The powerful functionality of the service will allow you to create professional maps in the shortest possible time. Using a large set of icons, you can personalize the map if you need to talk about a specific area of activity. Thematic markers will allow users to easily navigate the map. Markers can also be used to determine the location of a specific point. The marker supports various types of content - text, images, HTML code. To gain access to all the features of the service, you will have to sign up for a paid subscription, but if you register a free account, you can create maps with a limited number of markers, a maximum of 10.
The ZeeMaps mapping service makes it easy to create, publish and share interactive maps. The service is based on Google Map and with its help you can create even very complex map with a lot of data. Statistics can be imported from Excel, Access, MS Outlook and other programs. There are no restrictions on the number of markers; information can be changed at any time according to the user's wishes. You can add pictures, text, audio files, and videos from YouTube to markers.
The UMapper application allows you to create embedded flash maps. UMapper's visual editor is intuitive and allows you to add markers, draw shapes, and add interactive elements to your map. The service takes cartographic data from Microsoft Virtual Earth, Google, Yahoo, OpenStreet, which makes it truly universal. You can even make money using the application - if the created card receives 50 thousand views in a month, the service will transfer $12.50 to the user’s account. The disadvantages of UMapper include a watermark that appears on the map when using free version and displaying embedded advertisements on the map.
GmapGis is a simple online application for drawing on Google maps. You can place markers, measure the distance between two points on the map, draw lines and geometric shapes. All functionality is presented at the top of the page, so there will be no problems using the service - everything is very clear. The result can be saved as a file or as a link. While using GmapGIS, a problem may occur - the user cannot draw a line or draw a figure. In this case, the developers recommend closing and opening the browser again. After this, you will have full access to all functionality.
1) We drive the cat away and take a sheet of drawing paper (it’s good when it’s not just whatman paper, but paper with some kind of texture, for example watercolor). 
2) To make it convenient for us to draw, and for the pictures to be even and not warped, we stretch the paper onto the tablet. To do this, we soak it well with water, place it on the tablet and smooth it out so that there are no air bubbles left. 
3) Fold the edges of the paper and glue them to the tablet with PVA glue, Moment Crystal or Titanium. First glue one side, then the opposite side (pulling slightly). Then glue the remaining two sides one by one. 
4) We carefully bend the corners and glue them too. 
5) The tablet is stretched and now it needs to be tinted in a pleasant shade of antique parchment. 
6) To do this, we go to the bathroom so as not to spread dirt on the desktop. Again we kick out the cat, which managed to move there and is melting on the warm floor. 
7) Dilute a concentrated coffee solution in any container. The cheaper the coffee, the better (there is more dye))) 
8) We can take a sponge and gently dab coffee all over the paper, but we are real artists, so we just splash the coffee onto the paper and smear it with our hands. Doctor, in this spot I see... 
9) The paper on the tablet will appear in small waves, but don’t worry about it – they will smooth out after drying. Our coffee can flow into these waves, so periodically you need to tilt the tablet in different sides, dispersing these puddles. 
10) I was too lazy to do this, so the coffee dried out in streaks. Sometimes they are even beautiful, but this time I don’t need them and I smear them with a wet piece of cotton wool. 
11) Ha ha! Next, we draw the tablet into rectangles (I chose a size of 85x125 mm) and draw maps (for example, you can take real maps and draw from them, you still won’t get it exactly the same and will have your own author’s interpretation!) First, the most difficult thing - the pictures. We draw with black ink and pen, paint with pencils (or paints, as you prefer). You can use a white pencil to lighten some areas a little (it looks very advantageous on tinted paper). Draw freely and calmly, don’t be shy if you think you’re drawing some kind of nonsense. Believe me, carefully made, even cards will look good with ANY pictures, as long as the king can be distinguished from the queen))) Although in this case there is a letter designation in the corner of the card. 
12) In order not to suffer with the second half of the cards, I photographed them and printed them. Next, we transfer them to the tablet in a known way: reverse side We shade the pictures with a soft pencil and outline them on top with a pen. The pencil leaves an imprint. 
13) To make it even more impressive, draw a golden outline along the edge of the card (with acrylic paint, marker or gel pen). The pencil drawing MUST be fixed with a special aerosol varnish. 
14) After the varnish has completely dried, cut off the paper from the tablet. 
15) And the sheet turns out perfectly smooth! 
16) We pull the tablet again, we need to draw cards with numbers. I am sure that you have never paid attention to how the suit icons are arranged in tens, eights, sixes and other small fry))) We study this issue, draw diagrams for memory. 
17) We create a kind of modular grid to help ourselves. Here, by the way, all the peaks are drawn in the same direction and this is an error. One half of the spades should be turned in the opposite direction (crosses and hearts too, but with diamonds it’s all the same, they are symmetrical))). 
18) Again we take out black and (mmmmmm!) warm red carmine ink and draw all the digital maps. 
19) Next, using a knife and an iron ruler, we separate all the cards from each other. No matter how we measure, they will not turn out perfectly even, do not strive for this. 
20) For a card back, you can either draw a picture (then scan and reproduce it) or find a suitable one on the Internet. I found a suitable picture in the patterns on the wallpaper of my kitchen))) 
21) We print it on the printer in the amount of 36 pieces (four pieces fit per sheet). 
22) Let the size of the shirt be a little larger than the card itself - this way we can better glue the edges. It is convenient to glue with an adhesive stick. But it’s better to take glue from a more expensive brand, so that over time the glue doesn’t dry out and the backs of your cards don’t fly off like autumn leaves. Then we cut off the excess edges with scissors, at the same time rounding the corners of the cards. 
23) WE ALWAYS put our cards under the press. Preferably overnight. 
The winter cold outside the window and drifts on the roads are not very pleasing to lovers of active recreation and tourism, but they provide enough time to finally sort out pictures, routes and impressions from past hikes. Therefore, now is the time best time to write reports about your adventures and develop routes for the future. Of course, all travelers know and actively use the excellent Google Maps service for these purposes. However, the list of map services does not end there, and in this article you will learn about worthy alternative tools for creating, publishing and analyzing custom maps.
What sets Scribble Maps online service apart from many of its competitors is that this service is perfect for both beginners and cartography experts. Its simplicity and functionality make Scribble Maps one of the most popular mapping applications in education and science. The service offers users a wide range of capabilities, including marking maps, measuring distances, importing data in KML format, importing tabular data, applying custom labels, text, images and much more.

Open Street Map
Service Open Street Map (OSM) professes the same principles that formed the basis for the creation of the world famous Wikipedia. All the information here was collected through the efforts of tens of thousands of volunteers who provide the project with data from personal GPS trackers, aerial photography, video recordings, satellite images and street panoramas. While the accuracy of this data varies greatly by region, it is safe to say that OSM contains more detailed and up-to-date information than Google Maps for some areas.

The map editing function is available to all registered users. You can export data from your GPS device, draw routes manually, place markers, mark interesting and memorable places, give descriptions and comments. It is possible to export maps in OpenStreetMap XML format or as an image (PNG, JPEG, SVG, PD), and you can also get HTML code for inserting into any website.
Build-A-Map
Although Build-A-Map comes across as a little frivolous with its big, flashy icons, it's still a mature tool for creating maps and diagrams. The source of cartographic information here is Google Maps, on top of which the user can create his own layers and apply the necessary data to them.

The Build-A-Map service allows you to add not only banal marks and tracks, but also text labels, circles, polygonal shapes, lightboxes with photographs, plot routes, and so on. To all this, you can add weather information, Google Places points, and pictures from the Panoramio photo hosting site. The map obtained in this way can be saved in the service storage and shown a link to it, or you can receive a code for embedding in a web page.
Tripline
The Tripline service is unlikely to be able to help in developing a route for serious travel, but it is simply ideal for creating a multimedia presentation about the roads traveled. In its work, the service combines three components: a track of your route, photos and musical accompaniment, best representing the spirit of your adventure.

By combining all this together, the service will generate a spectacular story about your impressions, during which the viewer will move around the map along the route you took and see photographs linked to the shooting location. All this accompanied by wonderful music, of course. Having spent one effort after your trip on creating such an interactive report, you can paste it onto your page or blog, send it to all your relatives and publish it on social networks.
ZeeMaps
ZeeMaps provides users with a fast and easy way to create and share interactive maps of the world. With its help, you can visualize tracks in KML, KMZ or GeoRSS formats on the map, add your marks and comments. Distinctive feature This service is able to work with tabular data. So, if you have a table with the coordinates of the necessary points or, for example, the residential addresses of your clients, then you can feed this data to ZeeMaps, and it will accurately plot them on the map.

All cards are stored on the service’s servers and can be accessed at any time using a unique link. In addition, it is possible to print the map, save it as an image and receive an html code for embedding in a website or blog.
TripGeo
This service is interesting because it allows you not only to plot a track on a map, but also to see what it will look like in reality. TripGeo uses data from Google Maps and Google Street View and combines them into one interface, allowing you to take a virtual trip along your chosen route.

You will need to indicate the start and finish point, as well as the desired method of transportation (car, bicycle, foot). In addition, you should specify a few more parameters regarding rendering speed and image scale, after which TripGeo will select the optimal trajectory for you and immediately create a special widget in which the lower part will display the map, and the upper part will display the map. real view this place. All you have to do is click on the Play button and go on a journey.
The TripGeo service can serve well not only when preparing a trip, allowing you to more accurately find out information about the area, but also if you need a detailed explanation, for example to city guests, of driving directions. Now you don’t have to explain over the phone the signs of the street you need to turn onto, you simply send a link to the route created in TripGeo, and the person will definitely get to their destination.
The QuickMaps service lives up to its name: you can make a map here as quickly as possible. To do this, you don’t even need to register - just come up with a name for the card, short description and you can get down to business.

Although at first glance it may seem that there are not so many tools here, in fact everything you need is present. You can mark tracks with straight lines or free-hand drawing, make text notes, import KML or GPX files from the Web and upload them from your computer. And in terms of various markers, QuickMaps can give a head start to much more serious services.
Map constructor (Yandex)
This service is part of the Yandex.Maps project and, of course, draws information from there. In many cases, especially when it comes to the territory of Ukraine or Russia, this data may be even more accurate and detailed than that of foreign competitors. The map constructor allows you to plot a route, measure distances, draw polygons, and place points on the map area you need. Markers here can only be of one type, but each can be accompanied by a number and a comment that will appear when you click on the point.

You can save the finished map and immediately receive a code to insert into your website or blog. The service's capabilities are best suited for creating interactive maps, showing, for example, the location of your business or store, travel route or meeting point for a social event.
Animaps
As the creators of the service hint to us in its name, it is used to create animated maps. With its help, you can create a real multimedia presentation, where routes will be drawn according to the scenario you specify, markers will appear and disappear, and photographs and even videos will be shown at the right points. To evaluate the capabilities of the service, it is best to look at one of the maps created by it.

The main feature of this service is that you can use it to fairly accurately display not only the events that happened to you along the way, but also the time dynamics of the trip. Thus, Animaps is probably the most suitable service for creating an interactive report, after viewing which everyone will receive comprehensive information about your trip.
Bing Maps
The Bing Maps mapping service has long been somewhat in the shadow of its main competitor. And it was completely in vain - after the beginning of the friendship between Microsoft and Nokia, this service began to use data from Nokia Maps, which has always been distinguished by good coverage and excellent detail.

Within Bing Maps, the user receives only the minimum functions necessary to build a map, namely placing markers, drawing tracks and polygons with various types of lines, adding photos and comments.
To demonstrate the finished map, you need to save it, after which you can receive a direct link to the map and a code for embedding into any web page.
Conclusion
In this article, we looked at ten services designed for creating, editing and publishing custom maps. They all have their own features and different functionality, so choosing the best one greatly depends on the tasks you face. If you just need to make a driving map for the site, then the easiest and most convenient way is to use the Map Constructor from Yandex or QuickMaps. If you need to make an informative report about your trip, it is better to pay attention to Tripline and Animaps, which allow you not only to attach photos and videos to the track, but also wrap it all in an effective package. Well, for really serious work with maps, you should use Scribble Maps or Open Street Map, which have very rich functionality.
This is neither a photoshop tutorial nor a guide to creating a polished, finished map. This is a step-by-step demonstration of my method for creating cities as I make the first sketch.
The main thing is that the city map is logical.
- Draw the terrain and the most important locations
The city depends on the area. Therefore, the first thing that should be done is to draw the terrain on which the city is located. As an example for the material, I decided to draw a city located on a deeply protruding cape. The coast, except for the bay in the Northeast, is rocky and rugged.
Once you have sketched out the landscape, work from it to locate the main buildings. We place the castle on a hill with an open view of the sea and the surrounding lands. The cliffs flanking the high ground provide a natural line of defense. Any attack from land is only possible down the peninsula. It is clear that the city will first of all want to protect the harbor, so the logical thing would be to erect a wall that completely closes the peninsula from the rest of the land.
After I set up the main defenses, I added a port for fishermen (food) and a market near the docks (commerce). I also placed several large buildings - 4,5 and 7, which can be a temple, tavern and wizard's tower, respectively - these are the three most important locations in any fantasy city.
- Mark main roads
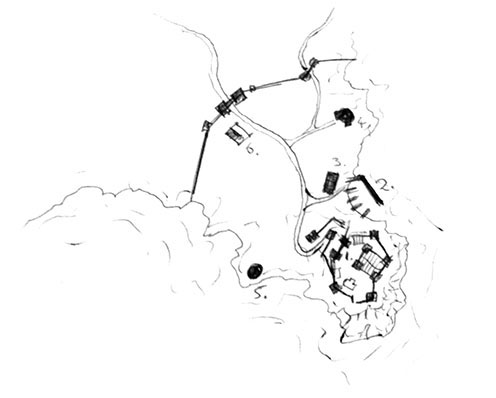
Roads get people where they need to go. In this case, the road should be a fairly direct route from the main gate to the castle. Remember that roads follow the contours of the area. Avoid straight roads in fantasy city maps - these cities are assumed to have no earth-moving equipment, so the roads constantly avoid obstacles. This will help give the city the appearance of a naturally grown settlement.
Once we have laid out the main artery, draw the main roads to the food source and commercial points - these will be the busiest routes. Also add a couple more lines. For example, I drew a road leading to the North-East, to the second gate.
- Sketch minor roads

A city map with only main roads looks empty. Add a network of small trails to fill the space. Remember that most small roads need to take people to the main roads. Add curves and angles to them to make them look more interesting and, of course, take into account the terrain.
- Integrate into house map

This may take time. It all depends on the scale of the map and its detail. I drew this sketch on paper about two inches square (5 cm2), so the buildings could be something like dots. So here the buildings are presented in the form of blocks grouped in the space between the roads. Ideally, when you finish drawing the houses, you should be able to see the roads, even if you remove the lines that marked them.
That's all. You have finished your sketch. Add keys to it - and it will be a full-fledged functional map of the city.
Often in work it is necessary to place a plan, diagram or map of the territory. Most examples of good work are made, as a rule, using minimalist techniques: simple lines and shapes, maximum information simplicity and accessibility. But when you try to create something of your own, you end up with a flat, inexpressive, cheap picture. Personally, I struggled with this issue for a very long time. And distinguish good map from a bad one, and even more so, I didn’t manage to learn how to draw something more or less decent right away.
I would like to talk about the map using an example of recent work. I was faced with a task: to improve the design of the map of the low-rise housing fair territory. They provided me with the original card. I think doing this from scratch won’t be too difficult either.

First you need to figure out what is bad about it.

After weak spots identified, you can start working. To begin with, I took the base of the card and simplified it as much as possible: I reduced the number of colors to three, removed unnecessary lines at the junction, all signatures and symbols. In general, simplifying as much as possible is already a great step towards improving any work. The result is something quite pleasing to the eye. Please note that I did not touch the lines themselves at all, they remained as simple as they were at the beginning.

Next I wanted to make it a little more interesting and add volume. If we skipped this step and then did everything else, we would get the same neat, but only flat map, these can also be found quite often.
Since I’m not a 3D guru and I don’t know how to work in 3D graphics programs at all, I decided to make do on our own- Photoshop and illustrator. First, I take the map blank, transfer it to a psd document, not forgetting to take into account the size of the future map when printing. When dragging, the map first turns into a vector smart object (to remain editable), and then I convert it to a regular smart object (to be able to transform the map). I transform the resulting “sandwich” using Transform - Perspective to give the plane the proportions characteristic of a three-dimensional look.

I transfer the resulting plane into Illustrator, not forgetting to immediately set the required dimensions of the future map. The easiest way to complete the three-dimensional look is to complete the houses by hand. In general, they can be copied from one, but the viewing angle due to the perspective view on the left and right of the map is quite different. Therefore, for each of the four sectors of the map, I drew a separate house, and only then duplicated it by copying.

Next are the signatures. Let's start with the house numbers. Initially, the sectors on the map were painted in colors that did not combine well with each other and with the map itself. The colors on the background of the card are soft, warm, and the gray color is neutral, it goes with everything. You can maintain the original division by color (blue, yellow, red, green), but take less “flashy”, muted shades of the same colors. Ideally, it would be nice to assemble a palette using a color wheel or find ready-made palettes of suitable shades on the Internet, but in this example I just selected the color by eye.

The house number icons are quite bright, so I make them the smallest design elements. The rounded square and font are part of the initial layout design I'm working within. Yes, they are not very important - the main thing is that the house numbers do not steal all your attention and make it possible to see what is underneath them. I made the global icons larger - garden tools, parking, smoking area, because there are not very many of them on the map. In general, the more elements of the same type, the more unified, small, bright and minimalistic they should be made. The icons themselves are completely ordinary, they can be found by searching “%subdjectname% icon” in Google in any quantity. What's important is that I made them more readable. For example, a cigarette icon is much clearer than an abstract green circle; To understand it, you don’t need to go into the legend and read what’s written there.

At the very end of the work, on the approved map, the customer asked me to add advertising spaces on the map: a logo and a couple of lines of text that would relate to a specific house. Everything on the map is already extremely dense; adding anything else means making it unreadable. So I used callouts.


