Ships on the map online in the Black Sea. Ship map. Before I give you the key
When you go through the check-in procedure on the ship, the first thing you do is receive a ship card. This a plastic card with a magnetic stripe that is the key to your cabin. In this regard, it is no different from a key in a modern hotel. When entering the cabin, you need to unlock the lock by inserting the card into the reader.
This is what ship charts from different companies look like.
The card usually contains your first and last name, the start and end date of the cruise, the name of the restaurant where you will dine, the meal change number and the table number. There must also be an identifier of the assembly point for conducting exercises and in the event of an emergency.
This card will also serve as your pass to the ship. When they first board the ship, each passenger is photographed and entered into a database. In the future, when entering/exiting the ship, the ship's security service will identify you on the card, checking your face with the photo in the database. Thus, if you already have a card, you do not need a passport when entering/exiting the ship.
Calculation facility on the liner
The card has another important function - it is a means of payment with which you will pay for all services on board. Important point- n You cannot pay with cash or a bank card on the ship. Each passenger on the ship is assigned a personal onboard account, the funds in which must be guaranteed either by a cash deposit or by linking to bank card. Any payments are made from the onboard account using the ship's card.
All this seems a little unusual, but is actually very convenient. While on board you do not need to carry documents, cash, or bank cards with you. You can leave your wallet in your cabin safe. All you need is a plastic ship card.
Fancy a cocktail at the bar? No problem, place your order and give your ship card to the waiter - the order amount will be debited from your onboard account. Along with the cocktail, the waiter will bring you a receipt, which you will need to sign. Need to buy an excursion or go for a massage? Just grab your ship card. You can always control the status of your onboard account either in special machines, or through interactive TV in the cabin, or by requesting an extract from the reception. If you lose your card, you must contact the reception. The card will be blocked and you will receive a new one.

As I wrote above, the onboard account is secured either by a cash deposit or a credit card - your choice. Both methods have their pros and cons.
Linking to a bank card is more convenient in the sense that you do not need to monitor the status of your account to see if you have run out of funds. The downside is that during the cruise the cruise company blocks the funds you spent on the card and then, after the end of the cruise, writes off the full amount. At the same time, previously blocked money can remain blocked for up to 40 days (depending on your bank). This creates a temporary double debit. Of course, the blocked money will return, but not immediately. For Europeans and Americans this is not a problem, since they use credit cards and it is not their money that is blocked, but the bank’s money. Russians, in 90% of cases, use debit cards, and their own money, which they may be counting on, is blocked. This may come as an unpleasant surprise.
Making a deposit in cash is more convenient in this regard; no one will block your money. If the money in your account runs out, you will need to top up your account during the cruise. If there is any money left in your account at the end of the cruise, it will be returned to you..
In my opinion, the most convenient way is to link a card, but a credit card, with interest-free repayment period. Now many banks offer such cards. This way you will avoid blocking your money, and you will also not have to think about the state of your account while on vacation.
Always check whether the waiter returns your card; sometimes they get confused and you end up with someone else’s card in your hands. You will have to contact the reception to block your old card.
The ship's map is usually not taken away upon disembarkation; it remains with you - this is a good idea for collecting. Especially if you understand that cruise sickness has struck you, and the completed cruise is not the last :)
Would you like to know where this or that sea vessel is currently located, which ships are located next to you, and which ones are moored in Buenos Aires, Sumatra or Singapore? The MarineTraffic.com network service gives you a unique opportunity to get a lot of useful information by the location and movement of the vessel you need on the map, its route, speed, cargo, weather in this region and so on. In this material I will talk about the real-time ship traffic map on the Marine Traffic website, and also explain in detail how to use the capabilities of this service.
AIS navigation
As you know, AIS (automated identification system) has been used in shipping since the early 90s, the main purpose of which is to improve the monitoring and safety of maritime transport. Its capabilities allow you to identify a ship, its course, dimensions and other parameters using VHF radio waves. The system covers an area of about 9 million square kilometers of coastal areas around the globe, including about 2,500 ports in areas of the highest maritime traffic.
In 2004, the International Maritime Organization (IMO) required ships with a gross tonnage of more than 300 tons to install a special AIS transmitter on board the ship. The latter’s responsibilities include transmitting in real time to a special receiving station all necessary information about the vessel, including its speed, course, location, name, dimensions, and other relevant data.

The site I'm reviewing, MarineTraffic.com, receives data from more than 1,200 AIS receiving stations around the world. After collecting data, they are transferred to a processing center, where they are processed and plotted on a map posted on the service. Wherein specified map ship movements online is available both through a browser on a desktop PC and through the corresponding application for mobile devices.
So what is Marine Traffic?
"MarineTraffic" - popular in the world network service for location tracking sea vessels. The resource collects real-time data about the location of the vessel (as well as information about its course, speed, tonnage, and so on). And displays it on the corresponding map, thereby greatly facilitating the work of people directly connected with the sea.

The purpose of the vessel traffic map service is to increase the transparency and efficiency of maritime transport. The site allows you to track the location of many vessels, making data on them available to ordinary users. At the same time, the resource is actively developing, inviting interested parties to take direct part in its formation and further progress.
If you want to look at you need to check out my selection best services link.
How to use the Marine Traffic real-time ship traffic map
After going to the website marinetraffic.com, you will immediately be taken to the service’s working map.

I recommend scrolling down the work screen and using the Russian interface instead of the default English one. At the same time, I will warn the reader that most of the interface will remain in English one way or another.
You will then need to go through the registration process (after which you will have access to a number of special options at the “My Fleets” level, allowing you to track the vessels of your choice). To do this, click on “Login” at the top, then on “Register”, and go through the registration procedure via email.
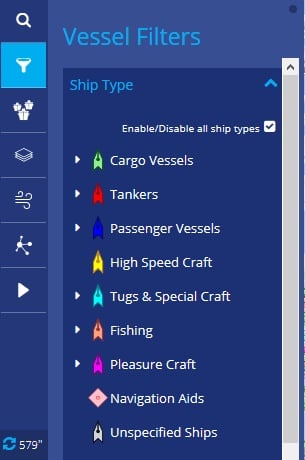
The map schematically shows different types of vessels in different colors (transport, tankers, passenger, high-speed, special, fishing, etc.)
By hovering the cursor over the vessel you need, you can get information about its name and final destination. More detailed information is available only after paying the appropriate fee for using the site (an annual subscription, a subscription depending on the number of vessels you have chosen, and so on).

Service control panel in Russian
The Marine Traffic service control panel is divided into two main parts - the left panel and the top panel.
The left panel contains the following options:

The top panel has the following options:
Conclusion
Despite all the richness of the Marine Traffic website’s capabilities, its free functionality is quite limited, being of interest only in terms of familiarization with the capabilities of the service. All the completeness of the information on the vessel traffic maps that the user needs can only be obtained by paying for the paid functionality of the site, which is really quite impressive and will be fully useful to people associated with the sea and maritime transportation.
June 28, 2017 12:58
"Treasure Hunt" is additional task Prey games. Abigail Foy created a fun challenge for four of her colleagues and companions in the game Mount Doom. They had to find the place drawn on the map, and then team up and come to her for the treasure. Now the reward will go to you if you complete everything for them. In this article we will tell you in detail where to find all the participant cards and what place these cards point to.
How to get the Treasure Hunt quest?
You can activate the Treasure Hunt mission by reading the email on the terminal of organizer Abigail Foy or one of the participants to whom it is addressed: Danielle Shaw, Emma Beattie, Elias Black and Zachariah West. For example, you will definitely find a letter on the terminals of Danielle Shaw, in her cabin in the residential section or on the worker in the data warehouse, on the terminal of Zechariah West at the entrance to the data warehouse, in the terminal of Emma Beatty in the fitness center.
Quests of the quest “Treasure Hunt”
First you need to find cards of four participants: Danielle Shaw, Emma Beattie, Elias Black and Zachariah West, which Abigail prepared for them. They are diagrams of specific places on the Talos 1 station where you will find the numbers. These numbers will then form a password, which will need to be entered on the organizer's terminal in order to receive the well-deserved treasure.
Find and study Rosaleen's (Emma Beatty) map
Emma Beatty's treasure map is on her. You can find her, alive or dead, in the residential section of the fitness center, where a telepath is mind-controlling a group of people. It is located on Level 1 between Crew A and Crew B. To enter the fitness center, you will need a code, which can be obtained from the concierge terminal located in the accommodation lobby.

Rosalyn's map shows part of the cargo bay - SAGITA's loading bay. You get to this room if you enter the cargo compartment from SAGITA.

The number is depicted on the wall near the terminal. Don't miss it on your way down.

Find and study the map of Mechetyk (Elias Black)
Elias Black left his treasure map in the residential section on the second level of the recreation hall. Enter it on the first level from the lobby of the residential section, and then go up the stairs to level 2. On the large table where the game was played, you will find a sticky note with a treasure map for Mechetyk. It lies next to Elias Black's transcript.

You won’t have to look for a long time for the place indicated on Elias Black’s map, especially since it is located in the residential section. You need to go into the room with the disposal, located on the second level of the residential section. Use the stairs near the medical bay, which will lead directly to it.

The number is written on the wall above the lockers directly opposite the entrance to the room.

Find and study the map of Holdinbuff (Zechariah West)
Zechariah West's treasure map is on him and is called "Treasure Map for Holdinbuff Flagdasterus". You will find his corpse in the arboretum on level 1, near the entrance to the data warehouse, where one of the gravity lifts from level 3 leads. Search him and the map is yours.

The location indicated on the Holdinbuf map is on life support. You need to go down by gravity lift from the first level to level B2 and go to the water treatment plant. If this is your first visit to this location, then due to the technopath, the electricity has been turned off and the doors leading to the station are not working. You have several options: open the doors without a drive using the Climb 3 skill, or climb inside through the service hatch, which you will find in the corridor if you climb through the pipes to the platform in the area of the fork.

In any case, the number you need is written on the wall next to the gravity lift at the water treatment plant.

Find and study Melinda's (Daniella Shaw) map
You will find Danielle Shaw's card on her work terminal in the data storage. It is located on Level 2 in the control center. The map must be downloaded from the “Files” tab. To get to the second level of the data warehouse, you will need the code for the exit to the stairs. It can be recognized from a note stuck on the Zechariah West terminal, which is installed at the entrance to the location from the arboretum.

Danielle Shaw's map shows the fuel storage facility located in SAGITT. You need to fly to the cargo tunnel and turn towards the cargo bay (Cargo Bay). You will come across the fuel storage along the way in front of the cargo compartment. The location shown on the map is on the top level.

The number is painted on the wall opposite the gravity lift. By the way, for the gravity lift to work, it is necessary to restore power and repair the switchboard.

The final part of the "Treasure Hunt" quest
The numbers found during the treasure hunt add up to a code that must be entered into Abigail Foy's terminal. It's in her cabin 109, located in the living quarters of crew quarters wing B. But first, you'll need a cabin pass. You can find it on the same large table in the recreation center on level 2 as Elias Black's treasure map.

In addition, you will need a password for the Abigail terminal. It is written on a note taped under the table with the terminal.

After gaining access, go to the “Functions” tab and enter the code. Since everyone has their own code (the numbers do not change, but are combined in different ways), you need to go to your transcriptor in the “Tasks” tab and see how the numbers line up under the completed tasks. This is your code.

Reward for the mission "Treasure Hunt"
Once you enter the code into Abigail Foy's terminal, you will have a new blueprint for the Adventurer's Arsenal v1.x chip. He is the reward for the task. Run to the nearest Fabricator and create one. To do this you will need 3 cubes of minerals and 2 cubes of plastic.

Properties of the Adventurer's Arsenal v1.x chip:
- Increased Item Recycling Efficiency
- Increased chance of critical damage with an adjustable wrench
- Increased flashlight efficiency
- Move faster in tight spaces
The Adventurer's Arsenal v1.x chip from Abigail Foy will replace several other chips at once.
-1) (_uWnd.alert("You have already rated this material!","Error",(w:270,h:60,t:8000));$("#rating_os").css("cursor", "help").attr("title","You have already rated this material");$("#rating_os").attr("id","rating_dis");) else (_uWnd.alert("Thank you for your rating !","You've done your job",(w:270,h:60,t:8000));var rating = parseInt($("#rating_p").html());rating = rating + 1;$ ("#rating_p").html(rating);$("#rating_os").css("cursor","help").attr("title","You have already rated this material");$("# rating_os").attr("id","rating_dis");)));"> I like 15The map represents the Far Eastern islands in the North Pacific Ocean. This quiet and peaceful region, which was visited by many scientific expeditions, happened to become the arena for many fierce naval battles. The map is available for battles at levels III–V.
Atlantic
The map represents an archipelago in the Atlantic Ocean, located off the coast of Portugal. In the past, it was a strategically important position for monitoring the movement of Allied convoys going to Africa and Europe. The map is available for battles at levels IX–X.
Great race
One of the maps for the initial levels. It is characterized by a large peninsula in the southwest, an archipelago in the center and a relatively free passage in the northeast. The archipelago in the center of the map can be skillfully used for unexpected ambushes and quick maneuverable combat, and the vast areas of open water on the flanks can be used for artillery duels at long and medium distances. The map is available for battles at levels III–V.
Harbor
Battles in this location will take place in an archipelago of small and deserted islands in the Atlantic Ocean. The islands, located on the outskirts of the British metropolis, were formed under the influence of constant oceanic wind, which affected the harsh but especially beautiful nature of these places. The map is available for battles at levels VII–X.
Mountain chain
The South China Sea, a zone of disputes and military conflicts from the 18th century to the present day. The sea was also the scene of active fighting during the Second World War. It was here that, for the first time in history, a formation of battleships that had complete freedom to maneuver on the high seas was sunk solely by aircraft. The map is available for battles at levels IX–X.
Greece
The prototype of the “Greece” map, available for levels IX–X, was the waters of the island of Santorini, but the atmosphere on the map is rainy and inhospitable.
Two brothers
The map represents a small archipelago resembling the north-west coast of the United Kingdom. The central element of the location is two very large islands separated by a strait. The map is available for battles at levels VII–X.
To the pole!
A special map for battles on ships of the first levels of levels in the “Superiority” and “Standard Battle” modes. We can say that these are “Ice Islands” for junior levels. A small area of the map, designed for dynamic battles of lower levels, is dotted with ice islands and is ideal for fierce maneuvering battles. The map is available for battles at levels I–III.
Ring
It is a group of small tropical islands scattered in the Pacific Ocean that resemble Hawaii in appearance. They are located on the border of interests of the Allied forces and the fleet of the Japanese Empire. The map is available for battles at levels IV–VI.
Land of Volcanoes
The map contains many volcanic islands and four extinct volcanoes. The main feature of the map is the respawn system: each team is divided into two groups that appear diagonally from each other. The abundance of small islands and narrow straits allows light, mobile ships to evade enemy fire, quickly find cover and hide from detection. The map is available for battles at levels VIII–X.
Ice Islands
The map represents a section of the cold waters of the far North and consists of several areas: clusters of small islands in the southern part of the map, larger islands in the north, large areas of open water in the center, west and east. The map is available for battles at levels IX–X.
fault line
The map represents the northernmost part of the Pacific Ocean. Here the US Navy carried out patrols to protect America's borders. Small islands framing the center of the location and separated by narrow straits, as well as open waters along the edges of the map, make this map universal for all classes of ships presented in the game. The map is available for battles at levels V–VII.
Trap
The Trap map, available for Tier VIII–X battles, is a group of strategically important islands in the heart of the Pacific theater of operations. According to legend, intense battles took place between the American and Japanese fleets between the rocky tropical islands and the vast atoll in the center.
A new dawn
The map is a complex tropical landscape - a scattering of islands, behind which destroyers and cruisers can easily hide. Perfect for both squadron battles and single flank raids. Wide straits between the land protrusions will allow even a battleship to hide. The map is available for battles at levels IV–VII.
Sea of Hope
The map represents a water area with an interesting landscape, located in the waters between France and Britain. The map is available for battles at levels IX–X.
Tierra del Fuego
The prototype of the Tierra del Fuego map, available for levels VIII–X, was the coast of South America, rich in deposits of strategically important resources. It is a very dangerous area: navigation on the map is made difficult by the large number of islands on which large copper mines are located. A unique feature of the location is narrow and elongated rock ridges that can hide small ships behind them.
Ocean
The location is a vast area of open water free of islands and, because of this, imposes special specifics on the tactics of the game. The Ocean map is ideal for squadron battles and long-range engagements of heavy artillery ships. The map is available for battles at X levels.
Okinawa
The map was created based on a real-life area near the Japanese island of the same name. The concept for the map was proposed by players O_sa070707zzzMELODY, lazerandr, NRG_9I and primus___ at the WoWs_Cartographer competition in September 2015. The map is available for battles at levels IX–X.
Shards
The Shards map offers the opportunity to battle among the North Sea islands, somewhere between Iceland and the Scandinavian Peninsula. The harsh landscape is dotted with a few fishing villages and naval bases supporting polar convoy guard ships. The map is available for battles at levels VII–IX.
Islands
A small but very picturesque map, ideal for your first acquaintance with World of Warships. The main action takes place in the straits between the islands located in the central part of the map, where destroyers and light cruisers can use their advantage in speed and maneuverability, and heavy artillery ships can realize their potential at medium and close ranges. The map is available for battles at levels I–III.
First milestone
The map where the introductory mission for beginners takes place. Not used in other aspects of the game.
A loop
The map represents the intersection of shipping routes in the Atlantic Ocean. The map is available for battles at levels IX–X.
Strait
The location was created based on the Mediterranean theater of military operations. The location will allow you to engage in battle off the coast of Italy, where the British fleet heroically defended Malta and the first massive attack of heavy ships by carrier-based aircraft took place. The map is available for battles at levels IV–VI.
Way of the Warrior
The location is an archipelago located off the coast of Canada, surrounded by a cold and inhospitable sea. The teams will have to find a way to each other through numerous islands. The map is available for battles at levels IX–X.
Split
The map shows the picturesque islands off the northern Atlantic coast of Canada. Important transport routes for convoys heading to Europe and Russia passed not far from them. The map is available for battles at levels IX–X.
North
The location represents the harsh and inhospitable waters off the coast of Scandinavia, which in the 20th century more than once became the scene of confrontation between the leading maritime powers of Europe. A huge map of three large islands and wide straits will allow each class of ship to fully reveal its combat potential. The map is available for battles at levels VI–X.
At the very beginning, we choose the main character, man or woman. After you wake up, put on the uniform hanging on the door. You can look around, read magazines and notes, look at messages on the computer. In the future, all viewed messages can be viewed in the menu. When you're ready, leave the room, take the elevator up to the roof, and board the helicopter.
Having arrived at the place, go inside the building and talk to the robot if you wish. After that, take the elevator down. Approach your brother Alex. After a short conversation with him, go to the test chamber.
Approach the glass wall where several scientists are standing. After a short instruction, press the red button, and then move the boxes that appear outside the circle. Go to the next room. You can hide behind a chair, or you can do nothing - you will still fail the test. Next room - press the button, jump over the obstacle and press another button. Next is the last room. Sit down at the table and start the psychological test. Answer the questions as you wish, then watch a short cut-scene.
Run
Waking up again, we look around the room again, read everything we come across, and also look at the messages on the computer. We select all the items, search the boxes, and then put on our uniform and leave the room. We select the adjustable wrench from the corpse on the left, and then the mysterious “January” will contact us.

We go back into the room and break the window using an adjustable wrench. Study all the computers and notes that you come across.
Go right, going around your room. In the room with the experiment chair, on the cabinet there will be a suitcase with a Stunner shocker, which is extremely effective against robots, as well as a Kinesthetic Assistant chip. We pass through the door with a burning orange light, then into the room with the helicopter. From there - into the corridor where we met with Alex. Through the now open reception. In the second side room there will be two chairs - one of them is a mimic, the same as the one that attacked the scientist at the end of the test. These little mischief makers disguise themselves as various objects that are nearby. You see two cups next to each other - one is most likely a mimic. A trash can rolled - again most likely it was a mimic. And so with every item.

We go up the stairs and go straight through the disinfection chamber. We watch how the mimic deals with the scientist, after which the alien multiplies. When they run away, the doors will open. In the next room, on the nearest computer on the left, read the message “Urgent!”, after which you will receive the additional task “Vanishing Corpse”.
Before us is a closed door to which we need a pass. Here you can do things differently. Firstly, you can use the ventilation shaft hatch on the right in the far corner. Secondly, on the right there will be Bellamy's office, in which there will be a key card to the simulation laboratory on the table. Beware of the mimics that are hidden among the objects around you.

Having passed into the next corridor, we will see a more formidable enemy - a phantom, although you don’t have to be afraid of him for now, he will not leave the confines of that room. We go along the corridor and pick up the GIPS gun. We also collect ammunition for it from the corpse. With its help you can make improvised stairs along the wall, seal holes in pipes, etc. It will also help in battle - with its help you can immobilize opponents for a short time and make them more susceptible to damage. There will be several mimics in the lobby. Try out the new gun on them. After this, “January” will offer to take the neuromod from the display case, the additional task “Everything is about to change.” We take it, pump it up, look around, and then go into the hall. We go down the stairs, after which “January” contacts us again and offers to go to your office.

Office with a great view
Facing the elevator, there will be a "Transtar Exhibition" on the right. There you can take the neuromod from the pedestal, but there is a phantom walking around there. In the early stages, the easiest way to deal with him is in 2 stages: first neutralize him using a gypsum gun, and then strike him with an adjustable wrench if you haven’t found a pistol or shotgun yet.

We go up to the third floor along the stairs nearby. We approach our office and enter code 0451 on the panel to unlock the doors. Inside, pick up everything you see. On the table near the operator distributor there will be a pass to Morgan's apartment and a pistol. There will also be a fabricator and a recycler on the premises. The recycler is used to process any items into materials, from which then, at the fabricator, if you have the necessary drawing, it will be possible to make weapons, first aid kits, cartridges and much more, which is extremely necessary for the passage.

After looking around, go to the computer. Take the pass to the teleconferencing center from the table and read the note attached to the monitor. Enter the password, read the messages and turn on the video “Watch me, Morgan” in the “Features” menu. We turn around and watch the video. In the video you can see the code - 5150. This combination is suitable for a safe from the Neuromods department.
Through a glass darkly
You will not be allowed to watch the video until the end. After first your brother Alex and then January contact you, we go back out. There will be two side rooms in front of the stairs. On the far table there will be a pass to the emergency room (you can also pick up a pass to the emergency room on the ground floor at the counter behind the elevators). We go to the teleconference center, located at the other end of the landing. Keep the gypsum gun ready, because... Several mimics will attack you at once. Immobilize them and then finish them off with an adjustable wrench. Just outside the door will be the corpse of Elias Black. Take the pistol and shotgun ammo from his body, as well as the blueprint for the 9mm ammo needed for the pistol. The pistol itself lies nearby.
You can go down to the emergency room. It is located one floor below. There will be two phantoms inside - normal and fire. Try to shoot the cylinders to cause maximum damage. It’s worth moving quickly and not standing still, because... the new kind Typhon creates a pillar of fire directly under the hero. In the lobby of the emergency room, you can download a map of the sector from a computer, and also view mail. The latter will continue the quest “The Vanishing Corpse”. Also inspect the entire medical bay. There is an operator distributor here, where you can call a medical operator who can always cure you, essentially an endless first aid kit, but tied to a specific area. In one of the rooms there will be a living person, Trevor J. Young, under mind control. For now, you won’t be able to disarm him without killing him, so if you want to get the “Do No Harm” achievement, wait until you have a special grenade - the null-wave silencer.

On the ground floor near the stairs there will be a security office. You can get inside through a pipe, which you should jump onto at the beginning of the corridor, and then jump from it into the ventilation shaft. Inside you can find a shotgun and ammunition for it. There is also a note with the code for the interrogation room - 1129. In the safe there is a drawing of cartridges for a 12-gauge shotgun, code 0526, it can be found here, in Sarah Elazar's office, in the book Orit. Also take the note from the table - this will begin the quest “Stolen Neuromods”.
If you go through the teleconference center and then across the bridge to the other side of the hall, you can get to the sales department, where the Huntress dart launcher will be lying on the floor. You can also find a box with four neuromods here - once you find it, complete the “Stolen Neuromods” quest.

On the second floor, from the landing you can walk along a narrow ledge to the staff rest room. Behind the bar will be the body of Octavia Figgs. After listening to her transcript, you will find out the code for the door to the pre-flight preparation room - 3884.
When you're done exploring the lobby, go up to the third floor using the same stairs you used to get to your office, go through the teleconferencing center and turn left, then go to new location- hardware laboratory. To do this, you will have to use an adjustable wrench to clear your way from the hardened foam.
There will be new enemy– infected operator. You can use the Stunner shocker for it. It knocks out a robotic enemy for a while and also deals significant damage to it. After stunning, you can finish it off with an adjustable wrench, but it is worth considering that when it is destroyed, it explodes, causing damage. Going a little further, in the corridor on the left you can take a neuromod. There will also be another infected operator and a mimic, and at the end of the corridor there will be a hall where, through glass, you can watch a scene about the unequal struggle between a scientist and a phantom. Take the staff entrance pass from Sean Larsen's body. Then you can jump down, especially if you want to go secretly, and climb into the ventilation. You can go back and go to the security point, where you can take cartridges, weapons, and also a drawing of cartridges for a pistol.

You can get to the next room with elevators to the second floor either through the front door near the security point, or through the ventilation, which was written about earlier. There will be a phantom inside. On the ground floor in the side corridor you can find the corpse of Aimee Schmidt, from which you can pick up a pass to the ballistics laboratory and a disposal grenade. It can be used to destroy Typhons, as well as clear the way for yourself by processing large boxes into materials. The ballistics laboratory itself will be nearby. You can find a variety of materials inside. The code for the safe is 8028 - you can read it in a note lying on the floor behind the bars.

In the southern part of the room, near Dr. Calvino’s workshop, you can get into a demonstration scene, the same room where you could watch the murder of a scientist by a phantom a little earlier. The phantom itself will be one level lower. There you can also find a recycler and a Huntress dart launcher. In the central room on the floor there is a chip with protection from ethereal damage.
We approach the workshop of Dr. Calvino. After January contacts you again, we return to the security point and place a marker on Lorenzo Calvino in the hardware laboratory. We go up to the second floor using the elevator in the next room. If you go into the corridor on the left, you will be attacked by a phantom and several mimics. There will be a terminal near the porthole. The password is on a note on the floor nearby. The second letter will contain the code for the mechanical shop storage room - 9501. Next you can get to Torstein’s office. The safe code is 9954.

On the second floor, in one of the side corridors, there is a marker about Lorenzo's body. If you go there, you will find out that you can only get to it from outside the station, and for this you will have to do “Artax”. We go into the next room - the machine shop. You can do this through the main entrance, but you will have to repair the electrical installation so that you do not get electrocuted, or use a gypsum gun to stop the shield from sparking for a few seconds. You can also go around the side for ventilation. We kill several infected operators and mimics. To get to the blueprint and fabricator, climb up the bales on the side. After you've done everything, open the gateway and go out to open space. Fly to the marker, search the body of Lorenzo Calvino, take the pass and transcript and return back. Go to Dr. Calvino's workshop. In the far corner of the room we turn on the power supply. On the terminal in the center we check the network utilities, and then look at the recording. Please note that on different screens the videos are from different angles. This way you can gain access to the doctor's secret safe. The thermos is lying on the floor big screen on the right in the nook if you stand facing the terminal. Place it on the scale and a panel will open next to it.

Go back to your cabin. The hall will once again be populated by Mimics and Phantoms, so be careful. Let's watch the video.
Talk to "January"
One of the shortest and easiest missions in the game - just talk to the operator.
Sharing Pass
After the conversation, “January” will give you a pass and a neuromod - take them from the table.
Data store
Go down to the main elevator and try to start it. When all else fails, “January” will contact you and give you the next main task, “A Workaround.”
Who are you, “December”?

Go to the door to the psychotronics laboratory. On the way, another operator will contact you and introduce himself as “December”. Follow the neuromod department, there in the foyer you will see a small scene, after which you will search the remains of the operator. You can continue the main plot or look around and climb to the second floor. There you can search the cabins of volunteers and production. In any case, you will have to return to the last room in the future to remove the copy protection (the additional task that you will receive if you do not do this now will be called “Copy Protection”) so that you can create unlimited neuromods on the fabricator number of times. We need Holden Graves' office. You'll have to sweat a little, because... It will be guarded by a rather strong enemy - a Technopath. The most effective against him is the Stunner, but only at close range, or disposal grenades. Below there will be a corpse with a pass to the desired office. Use a computer. When you're done with everything, return to the main task.

Workaround
Go forward along the only path. There will be a security point on the right. You can get inside either using a dart thrower (break the glass and then shoot the button), or you can also just hack combination lock. At the terminal inside you can download a location map.
Go to the showers. There will be a hole in the floor. We jump into it and at the end of the tunnel we take the psychoscope from the scientist’s body. It will allow you to scan typhons and gain their abilities. Scan the immobilized mimic nearby, then head back to the showers. Go further and take the elevator up. Scan the opened capsule to calibrate the psychoscope.

You will receive the additional task "Dr. Kelstrup's Neuromods." It is recommended for passing, because... receive the neuromod blueprint. Just go into the side room and search everything there. The safe will contain the treasured drawing. At the terminal you can watch a video about typhons, and pick up key cards from the doctor’s body. If you create many mods, the lock will turn on and the “Copy Protection” task will appear if you have not removed it earlier. If you haven't done this, you'll have to return to the neuromod department. The walkthrough for this quest can be found above in the mission “Who are you, “December”?”
When you're ready to continue, approach the large round door. If the psychoscope is calibrated, then you will be allowed to continue.

There will be a staircase on the right that takes you to the second floor. At the far end there will be a gateway, which it is better to open, and at opposite side you can find the transcript near the girl’s body on the chair and receive the additional task “Truth Lover.” When you're done here, go back down the stairs and scan the Weaver behind the large glass. There's a fork here.
You can go left. In this case, you will have to plaster the holes in the pipes to stop the fiery jets, and there will also be several mimics there. Having passed further, you will find yourself near a glass chamber with an experimental subject and will receive a new task: “Prisoner in the psychotronics laboratory.” Here you will have the first choice that affects the ending: you can free the prisoner by opening the cell door, or kill him by sending mimics towards him. All this is done at the terminal near the camera. If you release the prisoner, he will tell you the code to the door to the next room. Among other things, there will be drawings of 12-gauge shotgun and pistol cartridges with a silencer.

Also in the large room with the camera there will be a corpse of a woman with a psychoscope. There will be a transcriptionist nearby, after listening to which you will be given the task “Million Dollar Sealant”. To complete it, you need to go into outer space, since the airlock is nearby, and use a gypsum gun to seal the gap in the hull. After that, go back to the place where you found Christine Lloyd's transcript and kill the phantom in the room next to her corpse. Here you can find a lot of exotic matter. Having finished on this side, we return and pass by the large glass, behind which the Weaver is visible. We find ourselves in the observation room. On the right you can take the elevator down to the morgue. This is where you can continue the quest “The Vanishing Corpse”. You cannot get into the desired room without a pass, but you can break the window and shoot the button that unlocks the door with the Huntress dart launcher.

Take the pass from Sylvain Bellamy's corpse. Further passage of this additional task it will be possible to continue later, when access to the residential section becomes available. When you're ready, go to the terminal next to the large glass chamber and follow the suggested steps in the "Observation Department Management" section one by one. Kill the phantom that appears, and then proceed to the new location “Saggit”. You can go straight through the gateway, or before that you can go down the stairs and look around. There will be a long tunnel in front of us. Fly forward, avoiding the cystoids and their nests. The path forward will be blocked several times by locked gateways and other obstacles. To advance further, either pick the lock, or repair the electrical panel where necessary, or find ventilation. If the fan will work, fix it with a plaster gun. Fly until you reach a gateway that requires a pass. There will be a branch nearby. You will recognize him immediately, because... it will be with the field of gravity change. Follow there. Look around and listen to the transcript. Beware of energy surges. Every time he approaches, you will be warned - hide behind the cabinets. In the far corner, read the letters on the terminal and receive the task “Project Blackbox”. Mark Josh Dalton's location here on the terminal and download the location map. Climb to the second floor and climb into a field with zero gravity. Take the service tunnel pass from the scientist's body and return back to the locked airlock. When you reach the fork, follow the markers: the Arboretum in one direction, the body of Josh Dalton from the quest “Project Blackbox” in the other. First, let's complete an additional task. Fly towards the marker and you will see a large metal round pipe running along the wall. The body is behind her. To get into this pocket, fly along the bottom of this pipe and near the bend there will be enough room to fly under the pipe. Take the pass to the Blackbox laboratory from the body, and also find a K-beam gun nearby - a rather powerful weapon. Now you can continue the main task.

Fly towards the marker in the Arboretum. On the way you will have to encounter the Weaver. The K-beam gun will be extremely effective against him. We make our way through the gateway, and then move to a new location. Ahead there will be a corpse with a transcriptor. Listen to it to get the task " Dissatisfied employee" Climb the stairs and then climb into the ventilation. Here you will be given another task - “Problems with the elevator.”
To complete it, go to a new location and deal with the Technopath there. Use Stunner and EM charges to cause damage and disable him for a while. Once you clear the area, elevator travel will become available. Using it you can quickly move between the hall, life support and arboretum. Here, search Devris's corpse and take the key card. Listen to the transcript located nearby and receive the task “Do no harm!” To complete it, you will have to go down to the hall and go to the emergency room. In Devries's office, read the letters on the terminal and download the encryption key. Listen to the audio recording “Morgan: Hysterical” through your inventory. The code for the safe in the office can be found in the back room of the emergency room, behind the glass, - 7324. Next, we go to Dr. Kohl’s office nearby and run the test on the computer. Use the suggested answers: A, C, B, A, C. A safe will open nearby. Listen to the transcript lying there and complete the task.
When you're done, head back to the arboretum. Here you can take on a few more side quests:

"Save Rani." It is taken in a greenhouse - the building is located on a hill above the entrance to the residential section. However, don't rush to go there. To begin, walk along the narrow path that starts near the entrance to the residential section and leads to the gazebo. Read the note from the ground and get the code. Go to the greenhouse. Be careful here. There will be a dangerous enemy here - the Telepath. He subjugates people and directs them towards you. Once nearby, their heads explode, causing significant damage. A null-wave silencer or Stunner will help neutralize them. Open the greenhouse on the control panel using the received code. Do not approach people, fire a couple of shots from a shotgun at the Telepath, after which he will leave the greenhouse, and you can calmly deal with him without exposing people. Remember that Rani must survive for you to receive this task. The second option is not to open the door and climb onto the roof, from where you can start shooting at the Telepath. When he dies, talk to Rani. She will give the warehouse code AR01. Go to the warehouse and complete the task.

"Golden Gun" Create a staircase using the gypsum cannon on the rocks on which Alex's office is located. Climb up it and climb into the space under your brother's house. There will be the corpse of Marietta Kirkas. Deal with the electrical panel, and then take the pass from her body and the transcript, which is worth listening to. Next, the quest will continue in the residential section.

"Gardening Tips." Next to the body of Marietta Kirkas, whom we just visited, there is a small elevation of stones. Climb onto them, and then jump into a kind of crater. Julien Howard's body will be there. Listen to its transcript and create the necessary device at the fabricator. After that, go to the watering system next to the greenhouse. Place the device in the slot and press the button. Now you have to wait 10 real minutes for Dr. Howard's Superfruit to grow. Take it to complete the task. You can grow an infinite number of times, the main disadvantage is the long wait. At the same time, the fruit perfectly heals wounds.
Let's return to the main task - “Workaround”. Go towards the marker and take the elevator down. Listen to the transcript of Zachary West - his corpse will be right in front of the entrance to the data warehouse. Receive a new main quest - "Collecting Voices", and the "Detour" will be completed. Don’t forget to take a pass and a note, which, when checked, turns out to be a treasure map for the “Treasure Hunt” quest. Now our path lies in the residential section, but it’s worth taking a look at Alex’s office.
Who are you, “December”? (Part 2 - Arboretum)

Go up to Alex's office in the arboretum. The elevators don't work, so build a staircase along the edge of the hill using a gypsum cannon. Go inside and move the box blocking the entrance to the hatch located near the table. You will need the Climb II ability. Get inside and unlock the safe. Code - 2512. Take the key card to Alex Yu's apartment. Continuation of the quest - in the residential section.
Collecting votes
Head to the residential section. Here you will immediately be greeted by Nightmare and many people controlled by a telepath. Before Nightmare reacts, we immediately throw a null-wave silencer at the nearest people if we want to save their lives. If you kill at least one of them, you will not receive the “Do No Harm” achievement (if people explode themselves near you, then this will not be considered a murder). They can be temporarily immobilized with a GIPS gun, but if you pass nearby, they will still explode. There are two options with Nightmare: you can run away and sit out for a little over 2 minutes in a secluded place, or kill him. For the second option, a K-beam thrower is ideal, and for the first, a room with a waste disposal unit on the second floor (the door on the left as soon as you go up the stairs located to the left of the entrance to the residential section). There will be one phantom. You can take a pass from his corpse - Restricted Drugs. Also in this room there will be a piece of paper attached to the table with the code for the elevators to the directors' apartments - 3302.

"Kok's Request" is side quest Receive automatically as soon as you find yourself in the residential section. The cafeteria is located on the first floor in the far corridor on the right, if you stand with your back to the entrance to the location. The path will be blocked by many infected people. Use a null-wave silencer or a Stunner shocker (the latter is only effective at short range). Use the K-beam gun against the telepath. Once he dies, all the people he controls will lose consciousness. After this, go to the kitchen and talk to cook Will Mitchell. Take the pass and head to his cabin. Inside, listen to the transcript after completing the “Collecting Voices” part of the task, and also grab the medal from the nightstand near the bed. Return back to Mitchell and give him his reward. Go to his kitchen. The cook will complain that the water pressure regulator is broken. You can do it in two ways: you can repair the one lying nearby, or you can return to the arboretum and pick up a working device from the greenhouse. When you fix it, the cook will let you into the freezer. When you wake up, go to the back room. Abigail Foy's body will be there. Listen to her transcript. This will advance you in the main task, giving you the necessary voice sample, and also receive a new task - “Daniella Shaw”. Move the block of ice if you have the appropriate skill, or shoot the pipe on the left to melt the ice. After that, open the hatch and climb into the ventilation. The "Cook's Request" quest will be completed. Don’t rush to leave the kitchen—Mitchell left a mine on the door. Shoot the button that opens the door with a dart launcher to disarm the trap.

“Truth Lover” - part of this additional task is completed in the residential section. Follow the marker and search the girl's corpse. Listen to her transcript. After this, head to the security point on the first floor of the residential section and listen to the recording and read the report. Continuation of the quest - in the cargo compartment.
"The Vanishing Corpse" - go into Bellamy's room and search it, and the quest will complete.
“Golden Gun” - go to the desired cabin and open the safe (code 3479).
Let's continue with the main task. Visit Danielle Shaw's cabin and listen to the transcript lying there. You can also take on an additional task on the computer - “Treasure Hunt”. Another transcript will be in the cinema on the second floor under the seats. Another part of the voice can be obtained in the bar, also located on the second floor. In the far corner, climb into the ventilation and turn on the power supply. Near the stage there will be a small room with a terminal. Listen to the recordings. The next sample will be in the recreation center on a table on the second floor. You can also use it to get a pass to Abigail Foy’s cabin. Listen to the recording there on your computer and get 100% voice samples.

Having collected all the voice samples, or even if you haven’t collected them and you are too lazy to continue, you can begin the side task “Daniella Shaw”. Go to the fitness center (door code 5078). Be careful - there are a lot of people subordinate to the telepath there. The telepath himself is in a distant large room - a swimming pool. Kill him, then go to the window in the far corner and knock on it. Daniella Shaw will appear and give out a voice sample herself, and will also offer to deal with the cook. You need to look for it in the arboretum.
In this location you can take another one side quest. In the crew quarters on one of the upper beds, listen to Lawrence Baxter's transcript. This way you will receive the task “Gift for your beloved”. To complete it, you will need to return to the arboretum.
Who are you, “December”? (part 3 – Residential section)
Enter the password for the elevator (can be found on the second floor in the room with the disposal - 3302). The required pass will be under the globe on the nightstand. Just hit it with an adjustable wrench. Then you can leave the station using the rescue capsule, returning to the arboretum, but the game will not appreciate this and will offer to continue playing.

Restore from backup
We return to the arboretum. Here you can complete two side quests along the way:
“Daniella Shaw” - we go to the bridge of “Talos 1”. Our pretender will be sitting in the far capsule on the left. As soon as you enter the capsule, run away immediately, because... another of his devices will work. After this, the task will complete.

"Gift to my beloved." If you stand with your back to the waterfall, there will be a thick tree on the left. Move the stone near it. Take the pass from storage room A2. Kill the phantom inside and pick up valuable items.

Now you can return to the main task - “Restore from backup”. Let's go to the data warehouse. Unlock it using Shaw's voice password. Go forward and kill the technopath.
On the side there will be stairs to the second floor. There, on the terminal, you can continue the quest “Disgruntled Employee” by entering his number – 1129. After that, on the security service terminal, mark his location. It is located outside the station, so you will have to fly in outer space.
Upstairs, take the security pass to get into the room on the first floor. There, at the terminal, unlock the door to the archive. Follow the room with zero gravity. Fly down to the hard drive. Along the way you will come across many nests of cystoids, and the Weaver will also be waiting below. Take your backup hard drive and connect it to the server above. On the terminal, click “Connect disk” and go back. Go back up to the second floor to the room with the recycler and fabricator. On your computer, download the file “Activation_Key_U_M”. After this, you will be given the next task, “Keys to Paradise.” It leads to one of the possible endings. Since it’s easy to get one key, you can simply create it at any fabricator, and the second can only be obtained in life support, and this can only be done much later in the story, let’s return to the “Restore from Backup” quest.

On Danielle Shaw's nearby computer, access data module B, then go to the opposite part of the location on the second floor. You will need to move the closet. If you don't have the required skill, use a disposal grenade. Having dealt with the weaver and the phantom, follow the desired corridor. Open the hatch and press the button, after which you will find yourself in a capsule in outer space.
When you wake up, press the button and fly to the cargo compartment. As you approach it, Dr. Igwe will contact you and the quest of the same name will begin. Remember - you only have 7 minutes to save him. If you don’t have time or simply open his container, he will die, and this will affect the ending. Fly to his capsule and remember its number. After this, fly to the cargo compartment and at the terminal enter the number of the desired container - 2312. The container with Igwe will start moving and dock with the station. After that, through the same container, get inside the station.

Reception and dispatch
Go through the central doors (over the bridge) into the room with the survivors. Go up to the second floor and talk to Dr. Igwe, completing his quest, and then talk to Sarah Elazar. She will issue the task “Defense the cargo compartment”. It also affects the ending. To find the turret blueprint, you should go outside again and find the required safe through the hole. The code is 7527. To supply power to the fabricator, you need to walk along a long corridor covered in blue fire. This can be done from the top, moving along the racks and pipes. Click on the button on the switchboard and then exit through the door. You need to install at least three turrets in front of the door to compartment B (the area is highlighted with dark gray metal), it doesn’t matter how you get them. You can create them at a fabricator, or you can bring in ready-made ones. One will be right on the bridge, another in container number 05. To get to it, take the freight elevator at the terminal opposite. The third turret is with the survivors in the warehouse on the first floor. To open the door, either hack the terminal, or get the note from Gus Magill's body. After installing three turrets (more is better), Sarah Elazar will offer to open the door and provide a code. After you open it, a large number of different typhons will climb out of there. After you deal with them, the “Reception and Dispatch” task will be completed.

Follow the room with containers. You can search them, or you can go further into the loading bay of SAGITTA. There will be a container ahead. Pick the lock and take Annalize Gallegos' flash drive from the corpse. Thus, you will complete the quest “Lover of Truth.” Next, go to a new location - Life Support.
Ekaterina Ilyushina will contact you. To begin, go up one floor using the stairs on the right. Search the corpses. Erica Teague will have the password for the safe in the security booth - 9193. There will also be a passage barricaded with plaster. Break the obstacle and read the note from Elton Weber's corpse. It will talk about the cache. We go back down and walk past the faulty electrical panel (you need to either temporarily neutralize it using a gypsum gun or repair it). Using the elevator we go down to the floor below. There is a passage to the escape capsules. Where it bends, jump down under the bridge. There will be a cache there. One of the capsules will contain the Corpse of Emily Carter. Listen to her transcript to get another side quest, “Sobering Up.” To complete it, you need to go to the water treatment plant in the same location (the “Lifting III” skill is required). You need to restore the power supply (the control panel is to the right of the entrance) and go down the elevator at the far end of the room. There, use the terminal to open the hatch and complete the task.

It will also be useful in the future, before sending to the power plant, to look into the atmosphere control center at a higher level. Deal with the enemies and go around the entire structure from behind. At the terminal, stop the fans, jump down and remove the beam that is preventing the proper operation of one of the fans, then quickly leave the danger zone before the fans start working again. This can be done later, but at the same time it will save a lot of time in the future.

When you're done, go to the power plant. There will be a blocked door ahead. Hack the security terminal in the room in the middle of the corridor or use the gypsum cannon to build a ladder to the ventilation shaft in the far corner of the corridor above the operators' station. Go forward and take the elevator down. You will find yourself in a chamber with coolant. Deal with your enemies. The airlock is locked. The required key card will be immediately to the left. Use the gypsum cannon to put out the fire and take the pass. Go further and talk to Ekaterina Ilyushina. Whether you help her or not will affect the ending. You can go straight for the medicine into outer space through the cargo bay, or you can first restart the reactor and exit through the airlock here. You have 2 real hours to do everything about everything.

Go down to the reactor, first by elevator, then by stairs. The easiest way to get inside the control room is through the roof (requires Climb II). You can also pick the lock (level 4). On the terminal, click on "Emergency Switches". Next, read what is written on the tablet next to you. The correct order for changing the position of the opened levers will be given there: first three on the left, one by one, starting from the one farthest from the terminal, and then three on the right in the same way. After this, start the restart procedure on your computer. When a breakdown occurs, leave the room and enter the reactor through the glass doors. Walk around and you will see a broken diverter. Now there are two options: a longer one - to pick up a working spare part from the elevator, which you can find out from the transcript lying around here (you can get to the elevator by stairs), or to repair the existing part (3rd level of repair). Install a working diverter, return to the control room and continue restarting. Return to Ekaterina Ilyushina.

Now you can complete her quest “Help Ekaterina Ilyushina.” Unlock the airlock and go into outer space. Follow the marker, find the desired hole in the station's casing and take the medicine from the cabinet. Return to Catherine and inject it into her.
Keys to Paradise
Return to the hall. You will need to go through the coolant chamber again, but this time the room is shrouded in gray fog. One shot and it's game over. Go either through stealth or using a gypsum gun. You can immediately get into the hall through life support - an elevator on the upper level of the location. You will also receive a new additional task “Ekaterina Ilyushina”. To complete it, simply return to your office, where Dr. Igwe and Catherine will be waiting for you. Talk to them and receive a new task - “Catherine’s Father”.
To complete it, you will have to run to the data storage through the arboretum. While passing there, you will additionally receive a quest from Dr. Igwe - “Gustav Leitner”. Once in the vault, follow the marker. The required door is locked. There are two ways: crack the 4th level lock or build a ladder from a gypsum gun to climb onto the blue wires, and from there another one to crawl into the hatch. Once you get to the computer, you will have a choice - erase the recording or move it to the computer in your office and then return to Catherine and listen to the recording. If the entry does not appear on your computer, then talk to Ekaterina several times, and then check again. In both cases, the task will be completed, but the decision you make will affect the ending.

"Gustav Leitner" - through the arboretum, get to the residential section and go to Igwe's room. There, near the painting, play the suggested recording through your inventory and take it with Connectome. Give it to Igwe in your office to complete the quest.
It is better to complete both of these tasks before visiting Alex's office, because... After this, life will become seriously more difficult. Before this, it is better to stock up on ammunition, especially shocker charges, as well as EM grenades. When you're ready and have completed all the side quests you wanted, head to Alex's office in the arboretum. Now you will already have the code for the elevator - 1696.
Before I give you the key
Enter the password on Alex's computer and watch the video. Take the chip from the table and install it. Go out into outer space and scan two Coral nodes, then return to Alex’s office in the arboretum. You won't be able to finish what you started. Two combat operators will appear.
Consultant
To begin with, it is better to complete the additional task “Dal the Pursuer”. Run to the data storage and deactivate your beacon bracelet in the room on the second floor. You need to enter the code on the terminal - 0913. Luther Glass will contact you there and give you an additional task “Help Luther Glass. To complete it, you will have to return to the emergency room. It's actually a trap, and Luther is long dead. We will have to survive the attack of a huge number of combat operators. After this, the task will be completed.
In the hall you can also talk to Dr. Igwe about his task “Incapacitate Dahl.” This task is required if you want to leave the station. Follow the shuttle bay - a door on the first floor of the hall. On the left there will be a corridor through which you can get to the pre-flight preparation room, code - 5593. The only thing is that the road is blocked by a large cabinet - either move it, or use a disposal grenade. Here, from the table, take the pass from the shuttle control point - located on the right, if you stand with your back to the entrance to the location. Inside, pay attention to the non-working gravity lifts. From this room, go down the stairs to the lower level. A little closer to the center there will be a door that can be unlocked with an existing pass. Activate the gravity lifts and go back up the same stairs, then use the elevator to go up another level.

The control room is a room hanging separately from the ceiling. The bridge leading to it is broken, so climb onto the railing, accelerate and jump over. Extend the bridge using the terminal, and then go back down and enter the shuttle. Before this, you can also complete one more side task - “Escape Attempt”. To do this, go down the stairs in the same corridor that we cleared from the large closet. You will find yourself at the escape capsules. You will be asked to blow up the hatch. Go out into outer space (the airlock on the lower level of the shuttle bay), get to the desired hatch and knock on the red latches. Return to the capsules, open the hatch on the panel and launch capsule 2. The reward will be on the lower floor in the toilet on the panels under the ceiling.

When you're ready, board the shuttle. There will be a terminal near the cabin - on it we move the file with the task parameters. Now you need to find Dahl's technique. To do this, we go into outer space. Once you're outside, Dahl will make your life a little more difficult.
"Dahl's Ultimatum." You are given 15 minutes of real time to complete it, and the outcome of the task affects the ending. We fly to the power plant gateway, from there to the life support compartment. We go to the atmosphere control point. If you did not fix the fan earlier, then we go around the perimeter of the room and on the opposite side of the entrance at the terminal we stop the fans, quickly jump down and take out the stuck beam. After this, we leave the recess with the fans as quickly as possible. Now we go to the room here on the second floor. If you stand with your back to the entrance, it will be on the left (Dal is in a similar room on the right). We start the disinfection procedure on the remote control. So Dahl will lose consciousness. If you want to save the survivors, then under no circumstances kill Dahl. Let's go to his room. The door is locked with a level 4 lock. It can be hacked, but you can also break the glass near the stairs and walk through it. Ahead there will be a wall with panels, one of which glows red. You need to repair the air mixture regulator lying around and put it in place. Now people's lives are not in danger and the timer will turn off. Now let's deal with Dahl's technician - Kaspar. We will go to the psychotronics laboratory in a way convenient for you. On the way, Dr. Igwe will contact you and invite you to look into the neuromod department on the task “Incapacitate Dahl.” To get to Kaspar, go to the director's office, and then to the passage in the back of the room (you need to allow access to the conference room at the terminal in this room). The desired operator will hide behind the mirror.

"Incapacitate Dahl." Completing this task will open access to one of the endings - without this you will also not be able to save the survivors. Let's go to the neuromod department. Just follow the marker and you'll end up at the surgical terminal. Using a computer, immobilize Dahl, scan the brain, and then perform a neurotomy.
Keys to Paradise (part 2 - Arboretum)
Go to Alex's office in the arboretum. The brother of the main character/heroine will be hiding in the back room - you can easily find the door using the marker. Open it and talk to Alex Yu. To save your brother, simply drag his body back to the utility room from which he came and lock the door. Next will be the actual endings.
Mind without limits
In this option, create a prototype of a null-wave jammer at the fabricator, go to the psychotronics laboratory and install it in the heart of the coral. Then you need to go through the arboretum to the bridge of Talos 1. There will be a choice here, but if you want to activate the device and not blow up the station, then kill “January”. Launch the null-wave device on the terminal. Watch the video - the game is completed.

Death
In this case, go to the power plant and go down to the reactor. In front of the glass doors in the floor, open the hatch and press the button. Go down into the passage that appears. Insert two activator keys. Then you need to go through the arboretum to the bridge of Talos 1. Activate self-destruct. Here are a few options:
- Die along with the station. Sit in a chair opposite, next to the window.
- Run away. There are several ways to escape. Firstly, on the shuttle, but Dahl must be alive. Survivors, if any, will go with you. You can also leave the station on an escape capsule. In this case, follow the quest marker “Who are you, December?”
Epilogue
This is the true ending - you will see it after the credits. Here you will be reminded of everything you did throughout the game. To get the most good ending need to:
- Do not install neuromods in the Typhon skill tree. A little is possible, but without them at all is better.
- Rescue test subject Ingram in the psychotronics laboratory
- Rescue Dr. Igwe and then find his connectomes
- In the cargo compartment, help Sarah Elazar and set up turrets, and also prevent Dahl from strangling her and her people.
- Spare Dahl and leave him alive
- Bring the medicine to Ekaterina Ilyushina and let her listen to the compromising recording about her father.
- Find Danielle Shaw (knock on the glass in the fitness center) and then find volunteer 37 (cook Mitchell) trying to escape.
After you find out the truth, Alex will offer to shake his hand. You can either agree or kill everyone.


